
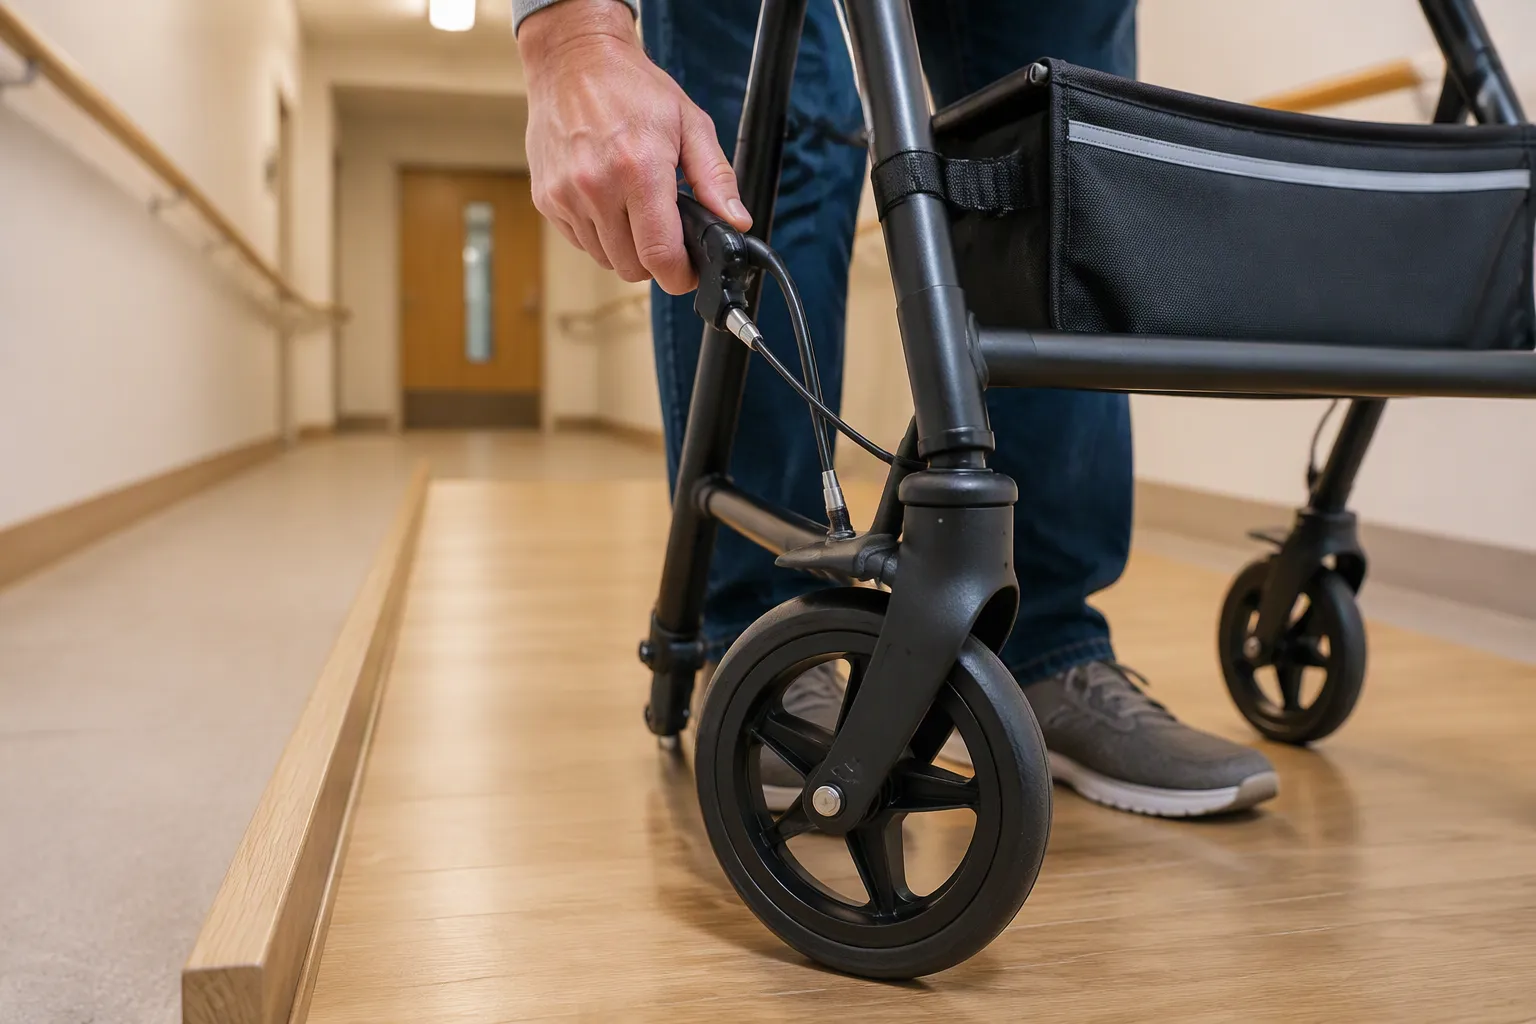
On flat ground, rollator brakes only hold a person’s weight in place. On a slope, gravity adds a second force that pulls the rollator downhill. That extra pull can exceed the brake’s grip. This is normal physics, not a defect. The brakes squeeze the wheel and create friction, and friction has limits. A rollator walker does not lock like a car’s parking pawl. The steeper the slope, the more the downhill pull grows. The harder the rollator brakes must work, the more likely rollator brakes slip on a slope. A rollator walker on a steep ramp often reveals this limit.
How Rollator Brakes Actually Hold You Still
The Basic Squeeze-and-Grip Design
Brake pads pressing against the wheel
A rollator stops through friction. The brake pads press against the rear wheels when the user squeezes the levers. This contact creates resistance. The resistance slows the wheel’s rotation. The rollator walker relies on this simple mechanical action every time the user wants to slow down or stop.
Why friction, not a lock, is doing the work
Friction is the force that holds the rollator in place. The brakes do not lock the wheels with a pin or a pawl. Instead, the pads grip the wheel surface. This grip depends on the force applied and the materials in contact. A rollator walker with properly adjusted brakes can hold position on flat ground because friction matches the demand.
What Happens When You Squeeze the Brake Handle
Cable pulls the brake mechanism
Rollators use loop-style brakes or separate lever designs similar to bicycle brakes. Loop brakes spread force over a wider contact area. Lever brakes offer more precise control. When the user squeezes the handle, a cable pulls the brake mechanism. This action presses the pads against the rear wheels.
Pressure creates resistance at the wheel
The user’s grip strength generates the braking force. The cable transfers that force to the pads. The pads press harder against the wheel. More pressure means more friction. This is called dynamic braking when the rollator is moving. The hand brakes must generate enough squeeze force for proper brake engagement.
Why “On” Does Not Mean “Locked”
The difference between a brake and a parking lock
A parking brake holds the rollator stationary. The user presses the levers down until they click. This locking function is different from dynamic braking. The brakes slow the rollator during movement. The parking brake keeps it still. A car’s parking pawl locks the transmission. A rollator’s parking brake only adds friction.
Everyday example: squeezing a pencil between your fingers
Think about squeezing a pencil between your fingers. A light squeeze holds the pencil. A stronger squeeze keeps it from sliding. The pencil can still slip with enough force. The same principle applies to rollator brakes. Loose or faulty brakes cannot generate enough friction. Proper adjustment ensures the pads press firmly. The table below summarizes the main brake system types.
| Aspect | Details |
|---|---|
| Main types | Loop-style brakes or separate lever designs |
| Stopping force | Brake pads press against rear wheels |
| Two functions | Dynamic braking and locking/parking function |
| Grip requirement | User must generate enough squeeze force |
The Forces at Work When You Stand Still
Your Weight Pushing Straight Down
Gravity pulls you and the rollator toward the ground
Gravity acts downward. It pulls the user and the rollator walker toward the earth. On flat ground, this force presses the wheels into the floor. The ground pushes back with equal force. The unit remains stable. The user’s weight creates a vertical load. This load does not push the device sideways. Every wheel carries a portion of that load. No horizontal component exists on a level surface. The device feels planted and secure. The user can stand without fear of unexpected movement.
The brake only needs to resist this downward pull
The rollator brakes only counter this vertical load. They hold the wheels in place. The downward force does not challenge their grip. The brake pads press against the wheels. Friction keeps the device stationary. The demand on the brakes stays low. No extra sideways force exists. This simplicity explains the steady feel. A light squeeze on the handles provides enough control. The user does not need to fight the rollator walker.
Why Flat Ground Is the Easy Case
No sideways pull on the wheels
A level floor creates no slope. Gravity pulls straight down. The wheels do not experience any horizontal force. The rollator walker does not want to roll away. The system only needs to stop rotation caused by movement. Once the device stops, the wheels stay still. The friction easily matches this simple demand. There is no competing pull from a hill. The setting remains calm and predictable.
The brake’s friction easily matches the demand
The unit remains stable under normal use. The rollator brakes hold the unit in position. A person can lean on the device safely. The parking brake keeps the wheels from turning. The force needed to hold the unit on flat ground is small. The wheel grip exceeds that requirement. Thus the system feels reliable indoors. In this calm scenario, the brake’s job is simple. The load never changes direction. The grip never has to fight an outside pull.
A Simple Analogy: A Book on a Level Table
The book stays put with almost no effort
Place a book on a level table. The book does not slide. Gravity pulls it downward. The table pushes upward. No horizontal force acts on the book. A light touch can move it, but it does not move by itself. The same principle applies to a wheeled walking aid on level ground. The device holds still because nothing pushes it along the floor.
Small nudge, small resistance needed
Give the book a small nudge. It slides a short distance and stops. The table’s friction resists the nudge. The device responds in the same way. A gentle push requires a gentle response. The system answers easily. It produces enough friction to stop the device. The effort matches the demand. This balance changes when the surface tilts. The next section explains that change.
What Changes on a Slope
Gravity Splits Into Two Jobs
One part pushes into the slope
On flat ground, gravity pulls straight down. The floor pushes back with equal force. Nothing pushes the rollator sideways. A slope changes this simple picture. The surface tilts at an angle. Gravity still pulls straight down toward the earth. The tilted surface no longer aligns with that downward pull. The force of gravity must now split into two separate jobs.
Physicists describe this split by projecting the weight vector onto two axes. One axis runs parallel to the slope. The other axis runs perpendicular to the slope. The perpendicular component pushes the rollator into the ramp surface. This part of gravity presses the wheels against the incline. The normal force from the ramp balances this perpendicular push. The wheels stay in contact with the surface. This component does not try to move the rollator along the ramp.
One part pulls you down the slope
The parallel component acts differently. This part of gravity pulls the rollator straight down the incline. It wants to make the wheels roll. The size of this parallel pull depends on the slope angle. A gentle ramp produces a small parallel pull. A steep ramp produces a large one. The mathematical relationship follows a sine function. The parallel component equals the weight times the sine of the slope angle. The perpendicular component equals the weight times the cosine of that angle.
This division of gravity creates a new situation. The rollator brakes must now resist a force they never faced on flat ground. On level floors, no parallel pull existed. On a slope, that pull appears. It grows stronger as the angle increases. The next subsection explains why this extra force surprises so many rollator users.
The Downhill Pull the Brake Never Expected
This extra force adds to what the brake must resist
On flat ground, the rollator brakes only hold the wheels still. The downward weight does not try to roll the wheels. The brakes face no horizontal challenge. A slope introduces that horizontal challenge. The parallel component of gravity pulls the rollator downhill. The brakes must now resist this new force. The total demand on the brakes increases.
The perpendicular component still presses the wheels into the ramp. This pressure creates friction between the tires and the surface. That friction helps the rollator stay in place. However, the parallel component works against this stability. It pulls the rollator toward the bottom of the ramp. The brakes must generate enough friction at the wheel to overcome this pull. If the parallel component exceeds the brake’s friction limit, the rollator brakes slip on a slope.
Why the brake suddenly feels “too weak”
Many users notice this change immediately. A brake that held firm on a kitchen floor suddenly feels inadequate on a wheelchair ramp. The brake itself has not changed. The pads still press the same way. The cable still pulls with the same force. What changed is the demand. The parallel component of gravity adds a new load. The brake must now fight two things at once. It must hold the weight in place. It must also resist the downhill pull.
This extra demand explains the feeling of weakness. The brake reaches its friction limit sooner on a slope. The user squeezes harder. The pads press harder. Sometimes that extra squeeze is enough. Sometimes it is not. The steeper the slope, the more likely the brake cannot keep up. This is normal physics. It is not a sign of a broken rollator walker.
The Book on a Tilted Table
Tilt the table and the book starts to slide
The book analogy from the previous section helps here. Place a book on a level table. The book stays put. Gravity pulls it straight down. The table pushes straight up. No sideways force acts on the book. Now tilt one end of the table. The book may still stay in place at first. A small tilt creates a small parallel pull. The friction between the book and the table resists that pull. The book holds its position.
Increase the tilt angle. The parallel component of gravity grows. The friction between the book and the table stays roughly the same. At some angle, the parallel pull exceeds the friction. The book begins to slide. The steeper the tilt, the faster the slide. The same principle applies to a rollator on a ramp. The brakes provide the friction. The slope angle determines the parallel pull. When the pull wins, the rollator moves.
The steeper the tilt, the stronger the slide
Building accessibility guidelines recognize this relationship. The table below shows common ramp slope ratios and their approximate angles.
| Guideline setting | Ramp slope ratio | Approx. angle |
|---|---|---|
| ADA commercial/public | 1:12 (1 in. rise per 12 in. run) | 4.8 degrees maximum |
| Residential preferred | 1:12 | 3-5 degrees |
| Residential common | 2:12 | About 10 degrees |
| Residential steep/limited space | 3:12 | About 15 degrees |
A 1:12 slope represents the safest residential option. This gentle angle asks little of the brakes. A 2:12 slope doubles the angle. The parallel pull grows. A 3:12 slope reaches about 15 degrees. This steep ramp increases the risk of tipping or rolling backward. The evidence notes that steep ramps create stability concerns for wheeled mobility devices. A rollator walker faces the same physics. The brakes must work harder as the angle increases. At some point, the friction limit is reached. The brakes slip. The rollator rolls.
This progression explains why slope angle matters so much. A gentle ramp of 3 to 5 degrees rarely causes problems. A moderate ramp of 10 degrees challenges the brakes. A steep ramp of 15 degrees may exceed their capacity. Users should treat slopes with respect. They should know the limits of their rollator brakes. They should plan routes that avoid steep grades whenever possible.
Why Rollator Brakes Slip on a Slope: The Friction Limit
Friction has a finite ceiling. When rollator brakes slip on a slope, the cause is a force imbalance, not a mechanical failure. To understand that imbalance, a user must examine the coefficient of friction and the slope angle. The two surfaces inside the brake mechanism set the maximum grip. The slope angle sets the amount of grip the brake must deliver.
Understanding the Coefficient of Friction
How “grippy” the brake pad and wheel are together
Every pair of surfaces has a coefficient of friction. This value measures how much grip exists between the brake pad and the wheel. A high coefficient means the pad bites into the wheel effectively. A low coefficient means the surfaces slide past each other easily. The coefficient depends on materials. Rubber-based pads against metal or hard plastic wheels generally produce strong grip. Hard, smooth plastic pads produce less grip. The brake mechanism multiplies hand force into pad pressure. That pressure, combined with the coefficient, creates the total friction. When that total friction falls below the demand, rollator brakes slip on a slope.
Why wet, worn, or smooth surfaces reduce grip
Coefficient changes with surface condition. Water acts as a lubricant between the brake pad and the wheel. A thin film of moisture reduces adhesion. Dust creates similar problems. Worn brake pads lose their textured surface. The contact area becomes flat and polished. Polished wheels reduce the grip too. A rollator walker with aged pads will not stop as firmly as it did when new. Smooth, hard wheel surfaces have less mechanical interlock. These factors are cumulative. Wet tires, worn pads, and smooth rims together lower the friction ceiling. The brakes still look functional. The pads still touch the wheel. The pair cannot produce enough resistance. The rollator continues to move when the slope demands more friction than the surfaces can supply.
The Role of Slope Angle
Gentle ramps ask little of the brake
Slope angle determines how much of gravity works against the brake. On a gentle ramp, only a small part of the weight pulls downhill. The brake easily counters that pull. A user can stand still with modest handle pressure. The same brake works comfortably on a 1:12 wheelchair ramp or a slight driveway incline. The friction supply remains higher than the demand. This situation feels safe and normal.
Steep ramps ask more than the brake can give
As the slope steepens, the downhill pull grows. The perpendicular force that creates tire grip also decreases slightly. The unit now resists a much larger horizontal force. The rollator brakes may feel weak on a steep ramp. For a rollator walker on a steep ramp, the risk grows. The brake pads press harder into the wheel. Yet the grip of the pad against the wheel cannot always increase enough. At some angle, the demand exceeds the supply. The unit starts to roll backward or forward despite the operator’s grip. The brake mechanism does not fail; it reaches a physical boundary. A rollator walker using old or wet pads meets that boundary sooner.
When the Downhill Pull Wins
The tipping point where slipping begins
Every slope has a tipping point. This point marks the angle where the downhill pull equals the maximum friction the brake pads can generate. Below the tipping point, the brake holds. At the tipping point, the forces balance perfectly. One degree more, and the pull wins. This boundary depends on the coefficient, pad pressure, and wheel condition. It also depends on the user’s grip. A weak squeeze lowers the tipping point. Aggressive handle force raises it. Once the parallel pull passes the threshold, sliding begins. There is no middle state. It either holds or gives way.
Why this happens suddenly, not gradually
The sudden onset surprises many users. They expect a gradual increase in sliding, like a tire slipping on gravel. Instead, the unit moves smoothly at first, then releases its grip all at once. This happens because static friction is higher than sliding friction. Static friction holds the wheel before movement. Once slipping begins, the surfaces switch to kinetic friction, which is lower. The grip drops immediately. The wheel breaks free and rolls. The operator feels the unit lurch forward. This sudden release turns a stable walker into a moving hazard. A user who understands friction limits can plan for it. Regular inspection of the rollator brakes keeps the tipping point as high as possible.
Why This Feels Like a Design Flaw (But Is Not)
Brakes Are Tuned for Flat Everyday Use
Most rollator use happens on level floors
Designers tune rollator brakes for a world of level floors. Most rollator use happens indoors and on smooth walkways. Brake sensitivity is a central factor in ease of use. A brake that responds too quickly can stop sharply and throw the user off balance. A brake that responds too slowly makes the rollator difficult to control. The goal is a middle setting. That setting must serve everyday conditions, not steep ramps. The table below shows the priorities that guide this tuning.
| Surface / Condition | Design Consideration |
|---|---|
| Slopes and downhill travel | Gentle, controlled squeezing to slow pace; reliable stopping is vital. |
| Uneven terrain | Slow movement is advised; the system manages speed on rough ground. |
| Indoor use | Controlled movement avoids collisions; the unit supports safe maneuvering. |
| Outdoor use | Reliable stopping is required; sturdy frames and larger wheels are prioritized. |
| Everyday obstacles | Responsive control supports safe stopping. |
| Stationary tasks | The parking brake must be engaged before sitting. |
Brake strength is a balance of grip and ease of use
A rollator walker includes a small adjuster where the cable meets the brake system. Turning this nut changes sensitivity. Loose or faulty brakes make stopping unreliable. Excessive tension makes every squeeze tiring. Designers balance grip against ease of use. The system must let an average user squeeze without strain. It must also generate enough friction to hold the walker on flat ground. This calibration works because the demand on the brakes stays low.
The Same Physics Affects Cars and Bikes
Cars slide on icy hills with brakes applied
A car on an icy hill slides even when the driver presses the brakes firmly. The tires reach their friction limit. The downhill pull overcomes the grip. The brake system is not defective. The same physical limit applies to a rollator walker.
Bikes struggle to stop on steep descents
A bicycle on a steep descent faces the same problem. Its hand brakes must work against a growing downhill force. The rider squeezes harder, but the brake pads can only produce so much friction. A rollator walker shares this limitation. The brake mechanism is not weak; the demand has simply outgrown the available grip.
What This Means for Your Rollator
It is not broken; it is reaching its friction limit
A rollator that slips on a slope is not broken. It reaches the friction limit of its rollator brakes. The rollator brakes respond exactly as designed. They squeeze the wheel and create resistance. A slope adds a downhill pull that exceeds that resistance. Users should treat this boundary as a warning, not a failure.
Knowing the limit is the key to safety
Users who know this limit can make safer choices. Safety guidelines recommend a maximum ramp slope of 1 inch rise per 12 inches run. Gentler slopes of 1:16 to 1:20 make starts and stops easier. Level landings at the top and bottom give a place to rest. Non-slip surfaces keep traction when wet. Every rollator has a specific tipping point. A rollator user who expects that point will not blame the rollator brakes. Instead, they will respect the slope and ask for help when unsure.
How to Tighten Rollator Brakes and Stay Safe on Slopes
When to Adjust the Brake Cable Tension
The first step involves recognizing when the stopping system loses its grip. The brakes do not engage properly if the lever travels close to the handlebar before resistance appears. A rollator walker that keeps moving under pressure also signals danger. These common signs your rollator brakes need tightening appear long before a serious fall. Loose or faulty brakes create a similar problem on gentle ramps. Users should listen for squeaking during braking. That noise often means the pads have worn unevenly.
Signs your brakes need tightening
The clearest warning arrives when the brakes feel loose. A user pulls the lever without feeling firm resistance. The rollator may roll backward on a mild incline. Another sign comes from uneven pad wear. If the rollator pulls to one side, the pads contact the wheel unevenly. The brake not engaging properly usually results from stretched cables. It can also indicate worn pads.
How cable tension affects braking force
Users need to adjust the brake cable tension when the lever feels spongy. A user can adjust the cable tension to restore proper brake engagement. Tight cables transmit hand force to the pads immediately. Loose cables absorb the squeeze before any pressure builds. Properly adjusted brakes respond smoothly. They do not lock suddenly. They also do not let the rollator drift. Proper adjustment matches the user’s grip strength. A user should tighten rollator brakes before relying on a slope.
Techniques That Reduce the Risk on Ramps
Keep your weight centered and move slowly
A rollator user should approach every ramp with a stable posture. They should keep their hands resting lightly on the hand brakes while walking downhill. This technique controls speed and prevents the rollator from running ahead. Moving slowly gives the brake pads more time to generate resistance.
Lean into the rollator to increase grip
Leaning forward shifts more weight onto the front wheels. This action increases traction. The rollator walker presses into the slope surface. The tires gain more bite. The brakes do not need to work as hard. Users should avoid leaning backward. That position lifts the front wheels and reduces control.
Ask for assistance on unfamiliar slopes
A user who cannot judge the ramp angle should ask for help. Physical therapists recommend treating every unknown slope as a risk. A second person can hold the rollator walker steady. This reduces the chance of slipping.
Brake Inspection and Adjustment Basics
Checking brake pads for wear
Brake inspection and adjustment should follow a regular schedule. Users should check pads every week. They should look for thin, hardened, or polished surfaces. Worn pads reduce reliable stopping power and can damage the wheel rims.
Testing brakes on a gentle slope before trusting them
A user should test the brakes on a safe, gentle incline. They should squeeze the hand brakes and confirm the rollator stops promptly. This field test confirms the brake adjustment. It also builds confidence.
To tighten rollator brakes, follow these steps:
- Inspect the brake cables for slack. If loose, use pliers to tighten the brake cables.
- Locate the cable tension adjuster. It usually sits near the brake lever.
- Turn the adjuster to remove slack. Apply the brakes after each small change. Each turn also adjusts the cable tension.
- Confirm the lever feels resistant. The pads should press firmly against the wheels.
- Even out pad contact if the rollator pulls to one side.
- Perform a final test on a level floor and a gentle ramp.
Loose or faulty brakes are a serious safety risk. If the brakes are not tight enough, they may not engage properly. Regularly tightening the brakes avoids this danger.
Every few months, check and tighten your rollator brakes. Rollator brakes face constant force from repeated squeezing. Brake pads wear down, cables stretch, and brake cable tension fades. A simple maintenance routine restores lost stopping power. The task takes only minutes. The process requires pliers, wrenches, and a screwdriver. Properly adjusted brakes also hold well on moderate slopes. A user who follows these steps can trust their equipment during daily use.
Choosing and Using a Rollator With Slopes in Mind
Selecting the right rollator requires attention to braking systems and wheel design. Each feature either helps or hinders control on inclines.
Features That Help on Inclines
The table below compares key features and their slope benefits.
| Feature | Slope braking/control benefit |
|---|---|
| Larger wheels (over 8 inches) | Reduce snagging on rough surfaces and improve control on outdoor curbs, brick paths, and old pavements |
| Hand brakes with parking locks | Help maintain controlled speed on slopes and allow the user to stay still safely |
| Drum (hub) brakes | Provide safe and balanced braking |
| One-hand brake configuration | Provides safer brake access for users with weak grip instead of disabling a brake |
| All-terrain design | Uses larger wheels, wear-resistant tires, and suspension to maintain control on gravel and uneven sidewalks |
Larger wheels and better brake pads
Larger wheels handle sidewalk seams and firm outdoor paths better than small wheels on many low-cost rollators. They reduce snagging and improve control. Better brake pads deliver reliable stopping power. A rollator walker with quality pads stops consistently, even when the operator squeezes the hand brakes gently. Larger wheels also support the rollator on slopes or uneven terrain. The all-terrain design extends this advantage. It keeps the rollator stable on gravel, brick, and uneven sidewalks.
Handbrakes designed for controlled descent
Hand brakes with parking locks serve two purposes. They maintain controlled speed during descent. They also allow the user to stay still safely on a slope. The brake lever should not reach the handle before stopping the wheel. Proper adjustment preserves this distance. Users should test the lever travel before trusting the device. Users who check this distance every month protect their hand brakes from premature wear.
Hub brakes as an alternative design
Drum (hub) brakes work differently from rim brakes. They enclose the braking mechanism inside the wheel hub. This design provides safe and balanced braking. Hub brakes resist water and dust. They perform consistently in wet conditions. A rollator with this system offers dependable control on outdoor routes.
Practicing Safe Habits
Safe equipment use also depends on daily habits. A user should apply the same caution on every outing.
Plan routes that avoid steep grades
Route planning reduces risk before the user leaves home. A user chooses paths with gentle ramps and level landings. They avoid shortcuts with steep driveway aprons. Public pedestrian routes with accessible grades provide the safest option. This planning phase protects the rollator brakes from overwork. The brakes respond better on a 1:12 slope than on a 2:12 slope. The user also avoids rain-soaked paths that lower tire grip.
Know your rollator’s limits before you need them
Every rollator walker has a physical boundary. The rollator brakes slip when demand exceeds friction. A user should test the rollator on a familiar gentle slope. This observation reveals the exact angle where slippage begins. That knowledge guides safe decisions. Uncertain users can ask for help. A helper can hold the rollator steady during descent. This simple awareness keeps the rollator under control. Well-maintained rollator brakes and careful route choices let a user navigate confidently.
Rollator brakes slip on a slope because gravity adds a downhill pull. On flat ground, the brakes only hold a person’s weight. This is normal physics, not a defect. Users should treat slopes with respect, choose gentle ramps, and ask for help when unsure. Regular inspection and knowing how to tighten rollator brakes keeps a rollator reliable. A person can tighten rollator brakes at home with simple tools. Properly adjusted brakes support stopping safely on flat ground and gentle inclines. With good habits and proper adjustment, a rollator walker moves confidently. A well-maintained rollator walker gives users control and peace of mind.
FAQ
Why do rollator brakes hold on flat ground but slip on a slope?
Flat ground creates no downhill pull. The brake only resists the user’s weight. A slope adds a parallel force from gravity. That force pulls the rollator downhill. When this pull exceeds the brake’s friction limit, slipping begins.
Does slipping mean the brakes are broken?
No. Slipping indicates a friction limit, not a defect. The brake pads still press the wheel. The downhill pull simply exceeds the available grip. A worn or wet brake pad reaches this limit sooner.
How can a user test brakes before trusting a slope?
A user should squeeze the brake levers on a gentle incline. The rollator should stop promptly without drifting. If the lever travels too far or feels spongy, the cable needs tightening. This test builds confidence before facing steeper grades.
How often should a user tighten rollator brakes?
A user should check brake cable tension every few months. Signs of loose brakes include a spongy lever feel and delayed stopping. Regular adjustment restores lost stopping power. Worn pads require replacement, not just tightening.
What slope angle exceeds a rollator’s brake capacity?
A 1:12 slope (about 4.8 degrees) represents the safest maximum. Steeper ramps of 2:12 or 3:12 increase the downhill pull. At some angle, the brake’s friction cannot match the demand. Users should avoid grades beyond 1:12 whenever possible.
Can a user prevent slipping on a moderate slope?
Yes. A user should keep weight centered and move slowly. Leaning forward increases tire traction. Squeezing the hand brakes lightly controls speed. Asking for assistance on unfamiliar slopes reduces risk.
Do all rollator brake types perform the same on slopes?
No. Loop-style brakes and lever brakes differ in force distribution. Hub brakes resist water and dust better than rim brakes. Larger wheels improve control on uneven terrain. Each design has specific slope advantages.
What should a user do if brakes slip on a slope?
A user should stop immediately and ask for help. They should not continue down the slope. After reaching level ground, they should inspect the brake pads and cables. Tightening the brakes or replacing worn pads restores function.