
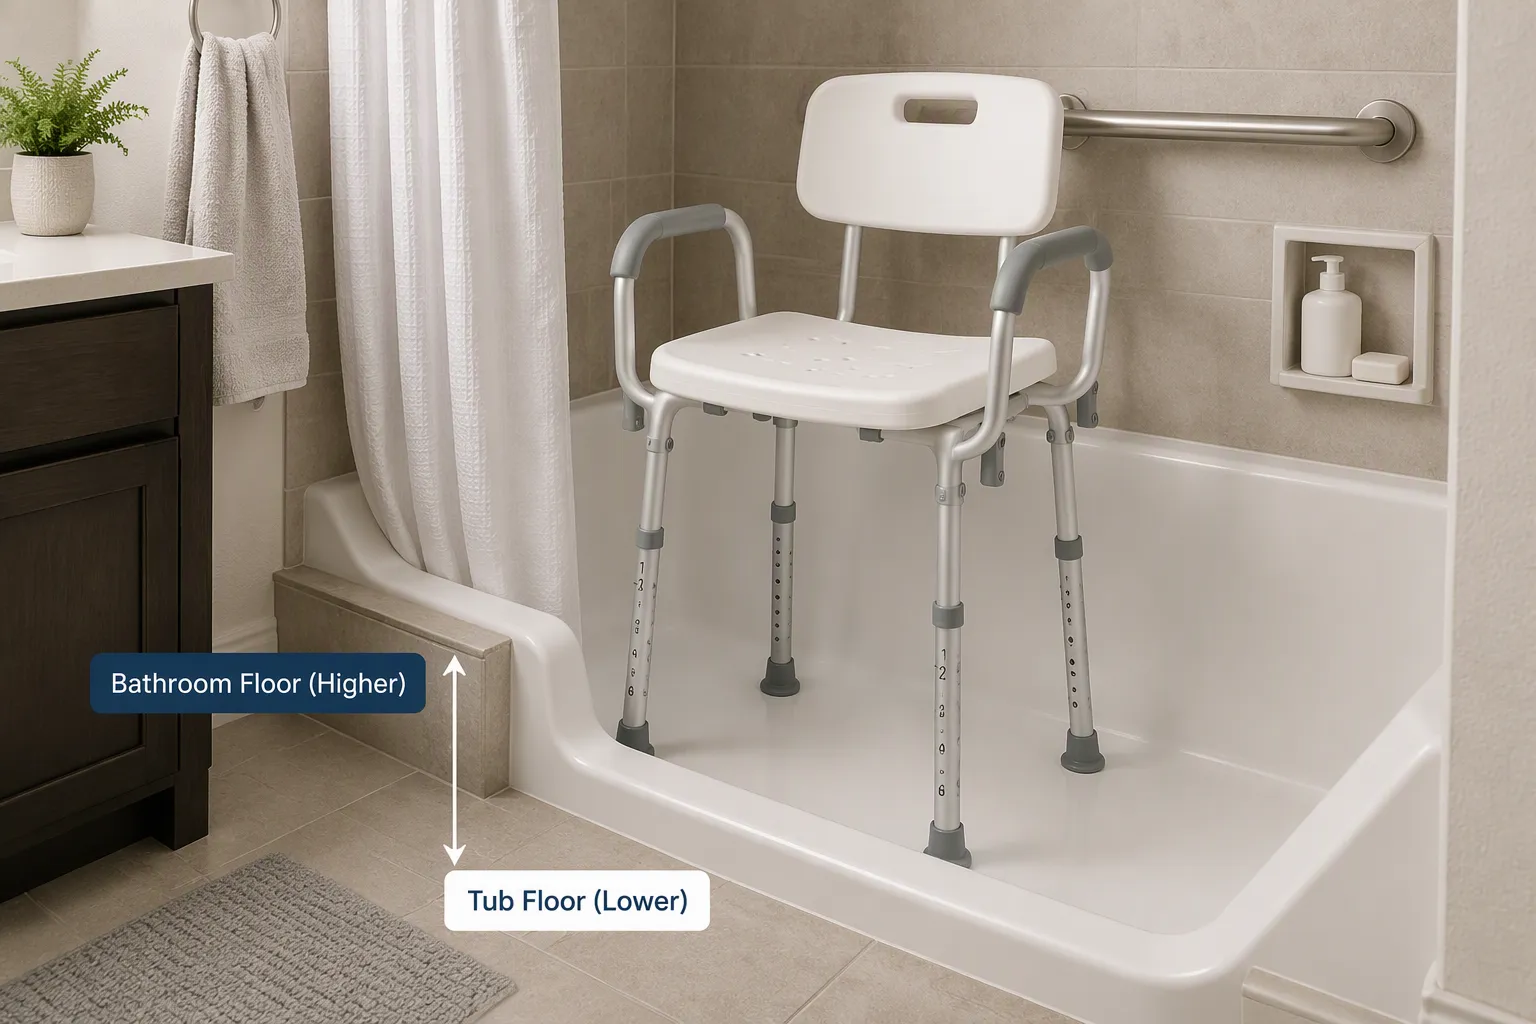
When someone asks how high should a shower chair be in a bathtub with a lower floor, the answer is simple. Set the shower seat so the user’s feet rest flat on the tub floor with knees bent at about 90 degrees. This height typically falls between 17 and 19 inches measured from the tub floor. Always measure from the tub floor, not the bathroom floor, because the tub surface sits lower. Correct height keeps hips and knees comfortable, makes standing easier, and improves safety during every transfer. Most shower chairs adjust easily to this range.
How High Should a Shower Chair Be: The Short Answer
The 17–19 Inch Range
Where the Range Comes From
The 17–19 inch range comes from accessibility standards and ergonomic research. The ADA Accessibility Standards guide for bathing rooms requires shower seats at a height of 17 to 19 inches, measured from the bathroom finish floor. This range approximates typical wheelchair seat heights. The match makes transfers easier for users who move from a wheelchair to a shower seat. The standard height for a shower chair therefore reflects decades of accessibility design work.
Ergonomic data support this range from a second direction. Popliteal height, the distance from the floor to the underside of the knee, averages about 45 centimeters (roughly 17.7 inches) across adult samples. A seat set near this level lets most users sit with their knees at a 90-degree angle and their feet flat on the ground.
| Measurement | Mean ± SD | Min | Median | Max |
|---|---|---|---|---|
| Popliteal height (PH) | 45.04 ± 5.48 | 38.15 | 46.00 | 51.00 |
| Knee angle (KA) | 96.98 ± 17.67 | 70.00 | 95.00 | 125.00 |
| Recommended seat height (5th percentile female PH) | 33.2 | — | — | — |
The table shows one important nuance. The recommended seat height derived from the 5th percentile of female popliteal height is 33.2 centimeters, which is lower than the population mean. Designers use the 5th percentile to ensure that shorter users can still reach the floor. The reported average sitting knee angle of 96.98 degrees sits slightly above a right angle. Typical sitting posture therefore exceeds 90 degrees by a small margin. This finding supports a seat height that keeps the knees relaxed rather than locked at an exact right angle.
Why It Works for Most Adults
The 17–19 inch height range works for most adults because it covers the middle of the population distribution. A person who asks how high should a shower chair be can usually trust this range as a starting point. Adult popliteal heights cluster around 45 centimeters, and the range accommodates users on both sides of the mean. Taller users land near the top of the range. Shorter users land near the bottom. The height range also matches common wheelchair seat heights, so a transfer from a wheelchair involves little vertical change. That consistency reduces effort and lowers the risk of a slip during the move.
The 90-Degree Knee Test
Feet Flat and Knees Bent
The 90-degree knee test gives a simple check for correct seat height. The user sits on the shower chair with feet are flat on the floor. The knees are bent at 90-degree angles, and the thighs rest roughly parallel to the tub floor. A correct fit shows no gap under the thighs and no pressure behind the knees. The feet should be flat on the floor without the heels lifting. This posture distributes body weight evenly through the hips and thighs. It also keeps the lower legs vertical, which supports stable standing later.
Signs the Height Is Wrong
Several signs reveal a seat height problem. A seat that sits too high leaves the feet dangling, and the user cannot plant the heels. A seat that sits too low pushes the knees above hip level and forces the user to climb out of the chair. Other warning signs include numbness behind the knees, redness on the thighs, and a feeling of sliding forward. The user may also rock forward repeatedly to gain momentum for standing. Each sign points to a mismatch between the height of the shower chair and the user’s leg length. A quick adjustment usually corrects the problem.
Why the Lower Tub Floor Changes the Math
The Drop Between the Two Floors
A bathtub floor sits below the bathroom floor by the depth of the tub. Typical tub depth runs 12 to 16 inches from the bathroom floor to the tub floor, and the curb adds another 4 to 6 inches of height at the rim. This drop matters because the shower chair stands on the tub floor, not on the bathroom tile. A chair leg set to 18 inches above the bathroom floor would sit far too high inside the tub. The same chair set to 18 inches above the tub floor sits correctly. The reference point changes the entire calculation.
How a Lower Seat Affects Standing Up
A lower seat changes the mechanics of standing. When the seat sits close to the tub floor, the user’s knees rise above the hips, and standing requires more force from the quadriceps. A seat set too low also increases pressure on the buttocks and reduces circulation during a long shower. A seat set too high creates a different problem. The user’s feet cannot reach the tub floor, and the transfer becomes unstable. The right height keeps the feet flat on the ground and the knees at a comfortable angle. This balance protects the joints and makes each transfer safer.
Why You Measure From the Tub Floor, Not the Bathroom Floor
The Height Difference Explained
Typical Tub Depth and Curb Height
A bathtub floor sits well below the bathroom floor. Standard tubs drop 12 to 16 inches from the tile to the tub basin, and the curb rises another 4 to 6 inches at the rim. This gap creates two distinct reference planes inside one small room. The shower chair rests on the lower plane, so the tub floor defines the true starting point for every measurement.
What Happens When You Use the Wrong Reference
A measurement taken from the bathroom floor produces a seat that sits far too high inside the tub. The user then cannot plant their feet on the shower floor, and the seat becomes unstable. The error is easy to make and hard to spot until someone sits down.
How the Drop Affects Seat Height
Measuring the True Seat-to-Floor Distance
The true seat-to-floor distance runs from the top of the shower seat down to the tub surface. A tape measure placed on the bathroom tile reports a number that includes the tub depth. That number overstates the real height by a foot or more.
Why a Standard Chair May Sit Too High or Too Low
Most shower chairs ship with legs set for a flat bathroom floor. Dropped into a tub, those same legs may exceed the safe range or fall short of it. Adjustable shower chairs solve this problem because the legs shorten to match the lower surface.
Comfort and Joint Strain
Hip and Knee Angles on a Lower Seat
Seat height directly controls hip and knee angles. Research on seated posture defines the target clearly:
“Keegan’s normal posture” — X-ray studies on 5 people lying on their sides (1955, 1960) show that stresses on the spine are most evenly distributed when legs are at 135-degrees from torso, i.e. 135-degrees hip angle and 45-degrees knee angle.
Practical bathing guidance sets more moderate targets:
| Joint | Recommended Angle | Additional Guidance |
|---|---|---|
| Hip | 90–110 degrees | Hips positioned slightly higher than knees; maintains lumbar curve and reduces spinal disc pressure |
| Knee | 90–120 degrees | Thighs roughly parallel to floor or sloping slightly downward toward knees |
Pressure and Circulation on the Seat
A seat set too low forces the knees above hip level. That posture loads the sitting bones and strains the lower back. A seat set too high presses the thighs against the seat edge and restricts circulation behind the knees. The correct height distributes weight evenly and supports a safe transfer into and out of the tub.
How to Measure for the Right Height
Measure the User First
Lower Leg Length From Knee to Heel
The lower leg length sets the foundation for every measurement. The user sits on a firm chair with both feet flat on the floor. A helper measures from the crease behind the knee straight down to the heel. This number represents the popliteal height, and it predicts where the shower seat should sit. Most adults land between 16 and 19 inches.
Thigh Length and Seated Comfort
Thigh length affects how far back the user sits on the chair. A long thigh needs a deeper seat for support. A short thigh needs a shallower seat to avoid pressure behind the knee. The helper records this measurement alongside the lower leg length. Both numbers guide the final fit.
Measure the Tub
Tub Floor Depth Below the Bathroom Floor
The tub floor sits lower than the bathroom tile. A tape measure from the bathroom floor down to the tub basin reveals this drop. Typical bathtub depth runs 12 to 16 inches. The user records this figure because it explains why standard shower chairs often sit too high.
Seat Placement and Clearance
The chair must fit inside the tub without wobbling. The helper checks the tub width and depth against the chair base. Clearance around the legs allows stable footing. The seat placement also needs room for the user’s feet during entry and exit.
Do the Math
Adding Leg Length to the Tub Floor Level
The calculation starts at the tub floor. The user adds the lower leg length to the tub floor level. This sum gives the target seat height above the basin. A user with an 18-inch lower leg needs a seat roughly 18 inches above the tub floor.
Checking the Result Against 17–19 Inches
The final number should fall inside the standard height range. A result below 17 inches signals a seat that sits too low. A result above 19 inches signals a seat that sits too high. The user adjusts the shower chair legs until the seat matches the calculated figure. This check confirms a safe transfer and comfortable posture.
Proper Height Adjustment: A Step-by-Step Guide
Proper height adjustment turns a good measurement into a safe, comfortable shower routine. The process follows a clear sequence. The user prepares the tub and chair, sets the legs to the calculated figure, tests the fit with a real sit, and fine-tunes until everything feels right. Each stage builds on the one before it. Skipping a step invites a wobbly seat, a strained back, or a risky transfer later.
Prepare the Tub and Shower Chair
Confirm the Chair Fits the Tub Floor
The chair must sit flat and secure on the tub basin before anyone adjusts a single leg. The user places the shower chair inside the tub and checks the footprint against the tub width and depth. All four legs should rest on solid surface, not on the curved slope near the drain or the rounded corners of the basin. A leg that hangs over a curve will wobble under weight. The user also confirms that the chair leaves enough room for the feet during entry and exit. Clearance matters because a cramped stance makes sitting down and standing up harder.
Check the Adjustable Leg Height Settings
Each leg carries its own adjustment mechanism, usually a push-button pin or a spring clip. The user inspects every leg before making changes. All pins and clips must sit fully engaged in their holes. A partially inserted pin can slip under load and drop a corner of the seat without warning. The user also confirms that all four legs start at the same setting. Even one leg adjusted differently from the others can make the seat feel unstable. This check takes a minute and prevents most wobble problems before they start.
Adjust and Test
Set the Legs to the Calculated Height
The user sets each leg to the figure from the earlier measurement. Most shower chairs print numbers or notch marks along the leg tubing, and these markings make the job straightforward. The user extends or shortens each leg until the mark matches the target height, then presses the pin until it clicks into place. A quick pull on each leg confirms the lock. The seat should now sit at the planned distance above the tub floor.
Sit, Place Feet Flat, and Check the Knees
A test sit confirms the setting in practice. The user sits down slowly and places both feet flat on the tub floor. The knees should bend at roughly a 90-degree angle, and the thighs should rest level or slope slightly downward toward the knees. The user checks for three things at once. The heels stay grounded, the thighs carry weight evenly, and no pressure builds behind the knees. A seat that passes this test supports a stable, low-effort stand.
Fine-Tune the Fit
Raise or Lower in Small Steps
Small changes produce the best result. The user moves each leg by one notch at a time, never by several. A single notch usually measures about one inch, and that increment is enough to correct most comfort problems. After each change, the user repeats the test sit and checks the knee angle again. This gradual approach prevents overshooting the target. It also keeps all four legs matched, which protects stability.
Recheck Stability After Each Change
Every adjustment deserves a fresh stability check. The user presses down on the seat and gently rocks the chair from side to side. A secure chair stays planted with no rocking, tipping, or sliding. The rubber feet should grip the tub surface firmly, even when wet. The user also confirms that all pins remain fully engaged after the change. A final press-and-rock test before stepping away closes the process. From that point on, a weekly inspection of the rubber feet, the height settings, and the frame keeps the chair safe for daily use.
Safety Tips for Transfers and Stability
Safe Transfer Techniques
Sitting Down and Standing Up Safely
A safe transfer starts with a stable base and a deliberate pace. The user backs up to the shower chair until the backs of the legs touch the seat edge. Both hands reach back for the armrests or the grab bar. The user lowers slowly onto the shower seat and keeps the feet flat on the tub floor. Standing reverses the sequence. The user slides forward, plants both feet, leans the torso over the knees, and pushes up through the legs. Rushing this motion invites a slip on a wet surface.
Using Grab Bars and Non-Slip Surfaces
Grab bars give the hands a fixed anchor during transferring in and out of the tub. The user confirms each bar is secure before putting weight on it. A non-slip mat inside the bathtub adds grip underfoot. The mat should lie flat with no curled edges that could catch a heel.
Keeping the Shower Chair Stable
Checking Leg Tips and Footing on the Tub Floor
The rubber feet on each leg carry the full load of the user. Worn or hardened tips lose their grip on a wet tub floor. The user inspects the tips before every shower and replaces any that look cracked or smooth. All four legs must sit level and firmly on the basin surface.
Weight Limits and Chair Placement
Manufacturers publish a weight capacity for every model, and the user should never exceed it. The table below summarizes the key checks.
| Consideration | Recommended Check / Limit | Purpose |
|---|---|---|
| Pre-use stability | Push down firmly on the bench before sitting; confirm it does not wobble or shift | Verifies the chair is secure before each use |
| Leg contact and leveling | Ensure all four legs are level and firmly in contact with the surface; adjust leg height to level on a sloped tub floor | Prevents tipping on uneven or sloped bathtub floors |
| Suction cups | For transfer benches, confirm the suction cups inside the tub are engaged | Anchors the bench to the tub surface |
| Non-slip feet | Legs should have large, soft rubber or suction-cup style feet that grip wet surfaces | Reduces slipping on wet tub floors |
| Standard weight capacity | 250–350 lbs; never exceed the manufacturer’s stated limit | Baseline safety limit for standard models |
| Heavy-duty weight capacity | 500 lbs or more, with reinforced frames and wider seats | Required for bariatric users or maximum support needs |
| Fit and footprint | Measure tub interior width at bottom and top; compare to bench footprint dimensions | Ensures a proper, stable fit in the bathtub |
Check for stability before every use: push down firmly on the bench before sitting, ensure it doesn’t wobble or shift, and make sure all four legs are level and firmly in contact with the surface. For transfer benches, confirm the suction cups inside the tub are engaged.
When to Ask for Help
Signs the Height Still Is Not Right
Several signals show the height remains wrong. The user’s feet dangle above the tub floor. The knees rise above the hips. The user rocks forward to stand or feels pressure behind the knees. Any of these signs calls for another adjustment.
Involving a Caregiver or Therapist
A caregiver can watch the transfer and spot problems the user cannot see. An occupational therapist offers the strongest guidance for shower chairs and height settings. These professionals assess leg length, balance, and grip strength. Their input protects safety for users with limited mobility.
Common Height Mistakes to Avoid
Measuring From the Wrong Floor
Using the Bathroom Floor Instead of the Tub Floor
The most frequent error involves the reference point. A person measures from the bathroom tile and sets the shower chair legs to that figure. The seat then sits a foot or more too high inside the tub. The user cannot plant their feet on the basin, and the chair becomes unstable. The correct approach measures from the tub floor every time.
Ignoring the Curb Height
The curb adds another layer of confusion. A measurement that includes the curb overstates the usable depth of the tub. The chair legs must rest on the flat lower floor, not on the rim or the curved slope near the drain. A leg placed on a curved surface will rock under weight. All four legs should touch the same flat plane at the same time.
All four shower-chair legs should be set to matching height positions and touch the floor at the same time. Do not stagger the legs to offset a sloped floor unless the manufacturer explicitly permits that procedure. Never place a leg on a curved wall, door track, drain lip, loose mat, or surface of a different height.
Skipping the Test Sit
Setting Height Without Checking Knees and Feet
Many people set the height and never sit down to confirm the fit. This shortcut hides problems. A seat set too low forces the user to lower and raise themselves more than they can safely control. A seat set too high leaves the feet unsupported and makes approaching the chair difficult. The reliable baseline is the knee-to-floor measurement taken while seated with feet flat and knees at roughly 90 degrees. Overall body height alone cannot predict the right setting.
Forgetting to Recheck After Adjustments
Every change to the leg settings deserves a fresh check. A user who raises one leg by a notch may create a wobble that did not exist before. The test sit confirms three things at once: the feet stay grounded, the knees bend comfortably, and the shower seat carries weight evenly. Skipping this step undermines the safety of every transfer and weakens the stability of the whole setup. A final press-and-rock test after each adjustment closes the process and protects the user during transferring in and out of the tub.
Choosing a Shower Chair for a Lower Tub Floor
Features That Help
Adjustable Leg Height With Clear Markings
A lower tub floor demands a shower chair with legs that shorten to match the drop. Adjustable leg height lets the user set each leg to the measured figure, and clear markings on the tubing make that job quick and accurate. Adjustable leveling feet also compensate for uneven bathroom floors, so the chair sits stably on a lower bathtub floor. Push-button pins or spring clips should engage fully, and printed numbers or notches help the user match all four legs at the same setting. This height adjustability turns a standard chair into a safe fit for almost any tub.
Non-Slip Feet and a Stable Base
Rubberized foot caps grip wet surfaces securely, and textured grip patterns on both seat and feet maximize stability, maintaining traction even with soapy water. An anti-tip design with a 350 lb weight capacity exceeds standard safety requirements. A wide base spreads the load and resists rocking on the curved basin. These features matter most during the transfer into and out of the tub, when a slip poses the greatest risk.
The table below summarizes the key features to weigh when selecting a chair.
| Feature to Consider | Supporting Detail from Source |
|---|---|
| Adjustable leg height | Adjustable leveling feet compensate for uneven bathroom floors, allowing the chair to sit stably on a lower bathtub floor. |
| Non-slip feet | Rubberized foot caps grip wet surfaces securely; textured grip patterns on both seat and feet maximize stability, maintaining traction even with soapy water. |
| Anti-tip stability | Anti-tip design with a 350 lb weight capacity exceeds standard safety requirements. |
| Ergonomic seating | Contoured, gently sloped seat reduces pressure points; handle positioned at optimal height for easy sitting and standing; rounded edges prevent discomfort. |
| Durability in wet environments | Weather-resistant HDPS construction resists cracking and discoloration; stainless steel hardware prevents rust. |
| Storage | Dual-purpose tiered design with a lower shelf to hold shampoo and towels within easy reach. |
| Easy assembly | Pre-drilled snap-in legs require minimal tools; ready within about 15 minutes of unboxing. |
Fitting the Chair to the Tub
Width and Depth Clearance
The chair must fit inside the tub without wobbling. The user measures the tub interior width at both the bottom and the top, then compares those figures to the chair footprint. A shower seat that crowds the walls leaves no room for the feet during entry and exit. Bathtub transfer benches often span the tub rim, so the user checks that the seat clears the curb and the inner basin. Proper clearance protects every movement.
Seat Style and Comfort
Seat style affects comfort during a long shower. A contoured, gently sloped seat reduces pressure points, and rounded edges prevent discomfort against the thighs. A handle positioned at optimal height makes sitting and standing easier. Shower chairs with weather-resistant HDPS construction resist cracking and discoloration, and stainless steel hardware prevents rust. A transfer bench with a lower shelf keeps shampoo and towels within easy reach. These details support a stable, comfortable routine.
The right height for a shower chair places the user’s feet flat on the tub floor with knees bent at about 90 degrees, usually 17 to 19 inches above the tub floor. Users should always measure from the tub floor, not the bathroom floor, because the tub surface sits lower. A test sit reveals whether the fit feels stable and comfortable, and small leg adjustments correct any problem. Proper height supports safe transferring. Users should check stability before every use and rely on grab bars for added safety. These habits keep shower chairs secure for daily bathing.
FAQ
How high should a shower chair be if the tub floor sits lower than the bathroom floor?
The user measures from the tub floor, not the bathroom tile. The seat should sit 17 to 19 inches above the tub basin. This height keeps the feet flat and the knees near 90 degrees. A measurement from the bathroom floor overstates the true height by a foot or more.
Does a lower tub floor change the ideal seat height?
No. The ideal height stays the same relative to the tub floor. The tub floor simply becomes the starting point for the measurement. A chair set to 18 inches above the basin works correctly. The same chair set to 18 inches above the bathroom tile sits far too high.
Can a standard shower chair fit a tub with a lower floor?
Many standard shower chairs offer adjustable legs that shorten enough for a tub basin. The user checks the minimum leg setting against the tub depth. A chair without adjustable legs often sits too high. Adjustable models give the user the range needed for a safe fit.
What happens if the shower chair sits too high above the tub floor?
The user’s feet dangle above the basin. The seat becomes unstable during entry and exit. The user cannot push up safely from a dangling position. This setup raises the risk of a slip. The user should lower the legs until the heels touch the tub floor.
How does the user test the height after adjusting the legs?
The user sits down slowly and places both feet flat on the tub floor. The knees should bend at roughly 90 degrees. The thighs should rest level or slope slightly downward. The user checks for pressure behind the knees and rocking in the frame.
Why does a transfer bench need a different height check?
A transfer bench spans the tub rim, so one side rests on the bathroom floor and the other sits inside the tub. The user checks the height on both sides. The inner legs must reach the tub basin. The outer legs rest on the tile. Both sides need stable footing.
When should the user ask a caregiver or therapist for help?
The user seeks help when the feet still dangle after adjustment or the knees rise above the hips. A caregiver can watch the transfer and spot instability. An occupational therapist assesses leg length, balance, and grip strength. Their input strengthens safety for users with limited mobility.
What safety checks keep the shower chair stable on a lower tub floor?
The user presses down on the seat before every use and rocks it gently. All four legs must sit level on the flat basin. The rubber feet should grip the wet surface firmly. Worn tips need replacement. Grab bars add a fixed anchor during every transfer.