
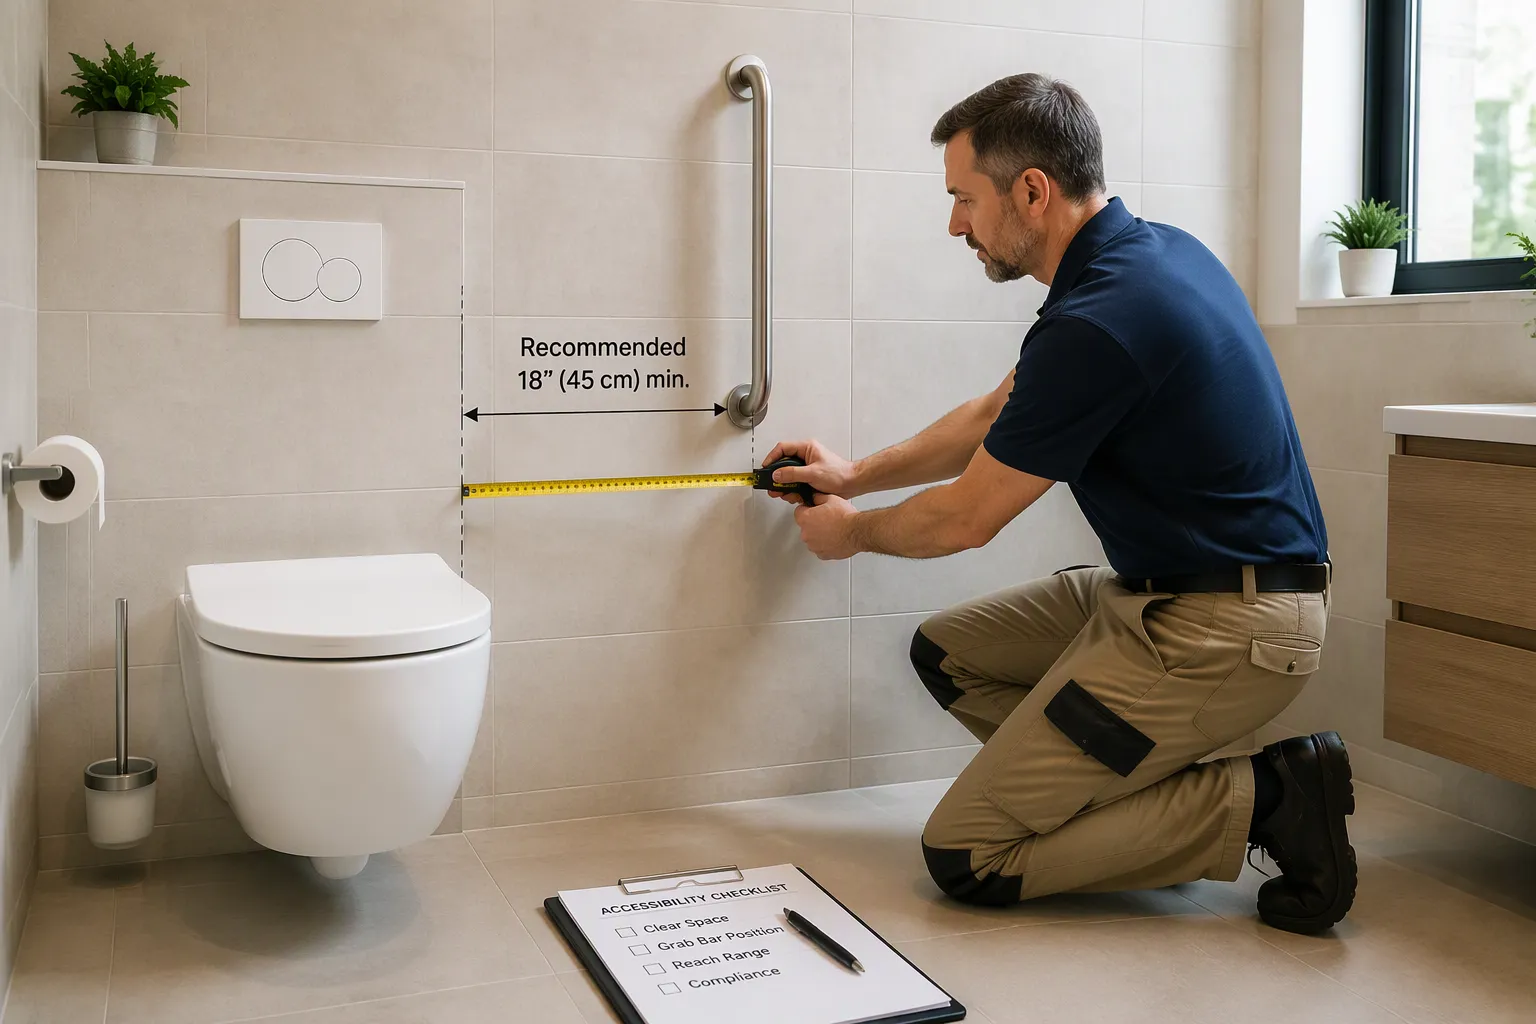
How much space is needed beside the toilet for safety rails? Plan for at least 30 inches from the toilet centerline to the nearest wall or obstruction, and keep the rail within 12 to 18 inches of the toilet bowl edge. The exact figure depends on rail type and local code, but 30 inches is the baseline most codes and manufacturers assume. Measure from the centerline of the toilet, not the tank or seat edge. A quick measurement now prevents returns, rework, and unsafe installations later.
The stakes are real. According to the CDC, 80% of falls experienced by seniors occur in the bathroom, and people with grab bars report higher confidence (4.30 vs. 3.17) than those without.
How Much Space Is Needed Beside a Toilet for Safety Rails?
Clearance From the Toilet Centerline
Why the Centerline Is the Measuring Point
The centerline is the fixed reference point for every clearance measurement in a bathroom. This line runs through the middle of the toilet bowl and divides the fixture into two equal halves. Manufacturers, code officials, and installers all measure from this line because it stays constant regardless of seat shape, tank size, or lid position.
Measuring from the tank or the seat edge introduces error. Tank widths vary by model, and seat edges shift when a lid opens. The centerline does not move. A tape measure anchored at the centerline gives the same result every time, which makes the number reliable for ordering parts and planning the layout.
The centerline also defines the usable zone on each side of the fixture. A rail mounted too close to this line crowds the user. A rail mounted too far away sits outside the natural reach path. Both errors undermine the purpose of the installation.
The 30-Inch Baseline Explained
Plan for at least 30 inches from the toilet centerline to the nearest wall or obstruction. This figure is the baseline that most codes and manufacturers assume. It gives the user room to sit, stand, and pivot without striking a wall or a fixture.
The 30-inch figure covers the total side zone, not just the rail itself. A wall-mounted bar projects into this zone, and the user’s body occupies part of it during transfer. The baseline accounts for both. Installers who shrink this dimension risk a cramped, unsafe setup.
Local codes may adjust the number. Some jurisdictions require more room in commercial settings. Residential rules sometimes allow less. The 30-inch baseline remains the safest starting point for planning, and it aligns with the clearances that most rail manufacturers publish in their installation guides.
Clearance From the Toilet Bowl Edge
Recommended Rail Distance From the Bowl
Keep the rail within 12 to 18 inches of the toilet bowl edge. This range places the bar where a seated user can reach it without leaning forward or twisting the torso. A bar closer than 12 inches interferes with the arm and the hip. A bar beyond 18 inches forces the user to stretch, which defeats the purpose of the support.
The measurement runs from the outer rim of the bowl to the center of the bar. Installers should confirm this distance before drilling. A dry fit with the rail held in position reveals reach problems early.
Space Needed for Grab and Swing
A user needs room to grab the bar and swing the body during a transfer. The hand closes around the bar, and the elbow bends. This motion requires several inches of clear area around the bar. Nothing should block the approach path from the wheelchair, walker, or standing position.
Hinged and fold-down rails add a second motion. The bar swings up or down, and the arc needs clearance. A rail that folds against the wall must clear the tank, the seat, and any nearby cabinet. Installers should test the full swing before final tightening.
Wall and Floor Clearance
Distance From the Side Wall
The side wall distance depends on the code that governs the project. Standard residential practice sets a 15-inch minimum from the toilet centerline to the side wall. ADA rules raise that figure to 16 to 18 inches. The table below summarizes the key figures.
| Requirement | Specification |
|---|---|
| Toilet distance from side wall (centerline measurement) | 16 to 18 inches |
| Clear floor space in front of toilet | Minimum 56 inches deep × 60 inches wide |
The same evidence appears in list form for quick reference:
- Standard toilet centerline to side wall: 15 inches minimum
- ADA toilet centerline to side wall: 16 to 18 inches
- ADA front clearance: 56 inches (wall-mounted) or 59 inches (floor-mounted)
- ADA clear floor space at water closet: 60 inches wide × 56 to 59 inches deep
These figures guide the placement of any bar on the side wall. A bar mounted on a wall that sits closer than the minimum leaves too little room for the user’s shoulder and arm.
Floor Space Around the Base
The floor space around the toilet base must stay clear for feet, canes, and walkers. ADA sets the clear floor area at 60 inches wide by 56 to 59 inches deep. The depth varies with the mounting style. A wall-mounted fixture needs 56 inches, and a floor-mounted fixture needs 59 inches.
This clear area extends in front of the fixture and to the sides. Floor-mounted rails sit inside this zone, so installers must subtract the rail footprint from the usable area. A cluttered floor defeats the purpose of the rail, even when the bar itself sits at the correct height and location.
Space Needs by Toilet Safety Rails Type
The rail type changes the space picture more than any other factor. A floor-mounted frame claims floor area. A wall-mounted bar claims wall area and hidden framing. A hinged rail claims a swing arc. Each design solves a different problem, and each one fits a different room. Matching the rail to the actual clearance beats forcing a room to accept the wrong hardware.
Floor-Mounted Safety Rails
Footprint and Floor Clearance
Floor-mounted safety rails stand on their own legs and anchor to the floor. The frame wraps around the toilet base, and the support arms rise on one or both sides. This design needs no wall studs and no blocking, which makes it a practical choice for rooms with tile, concrete, or masonry walls.
The footprint is the trade-off. The legs sit beside the bowl and often extend several inches beyond the toilet’s widest point. Installers should measure the distance from the toilet centerline to each leg and confirm that the legs clear the door swing, the vanity, and the tub. A typical frame needs roughly 24 to 30 inches of width to sit level and stable.
Floor clearance matters as well. The frame must rest on a flat, solid surface. A threshold, a floor drain, or a slope in the tile can rock the frame and weaken the anchor points. Users also need room to step over the base rail without catching a toe. A low-profile base helps here, and so does a clear path in front of the fixture.
Best Rooms for Floor-Mounted Rails
Floor-mounted rails suit bathrooms where the walls cannot take anchors. Older homes with plaster over lath, rental units where drilling is limited, and rooms with radiant floor heat all fall into this group. The frame carries the load to the floor, so the wall material stops mattering.
These rails also fit rooms with generous floor area. A large bathroom with open space on both sides of the toilet gives the frame room to sit without crowding the walkway. The design works well in master baths and accessible family bathrooms where the fixture stands apart from other elements.
Wall-Mounted Safety Rails
Wall Space and Stud Requirements
Wall-mounted grab bars attach directly to the wall and project into the side zone. They save floor area because nothing touches the ground. The trade-off moves to the wall: the bar must anchor into solid framing or approved blocking. A bar fastened to drywall alone will pull free under a user’s full weight.
Installers locate the studs before they drill. A stud finder and a light probe confirm the framing behind the finish. When no stud sits where the bar belongs, the installer adds blocking or uses a heavy-duty toggle designed for grab bar loads. The wall space needed runs the length of the bar plus a few inches on each end for the mounting flanges.
The bar’s height also depends on the wall. A bar set at the wrong height forces a reach that feels unnatural. Standard practice places the bar 33 to 36 inches above the floor, and the installer confirms that height against the user’s reach before tightening the screws.
Best Rooms for Wall-Mounted Rails
Wall-mounted grab bars shine in small bathrooms. They free the floor for wheelchairs, walkers, and foot traffic. A powder room or a compact hall bath gains usable room when the support comes off the wall instead of the floor.
These bars also fit rooms with reliable framing. New construction with exposed or mapped studs makes the installation straightforward. Renovated bathrooms with added blocking offer the same advantage. The design pairs well with a tub or shower nearby, where matching wall-mounted grab bars create a consistent look and a consistent grab height.
Hinged and Fold-Down Rails
Swing Clearance When Folded and Extended
Hinged and fold-down rails pivot on a wall bracket. The bar rests flat against the wall when not in use and swings out when the user needs support. This motion solves the crowding problem, and it creates a new measurement problem. The installer must check the rail in both positions.
Plan ahead to decide which side of the toilet the folding grab bar will be mounted, so the required 18 inches of clearance and extra wall reinforcement can be positioned on that side. Centering the toilet within a 36-inch space, rather than the 33-inch usable-bathroom minimum, is recommended even though codes do not mandate it. With the toilet centered, reinforcing can run the full length behind the toilet, and fold-up bars can be installed on either side based on the user’s needs.
Fold-up and flip-down rails suit tight spaces where a fixed bar would obstruct movement, wheelchair access, or door swing; verify both folded and extended dimensions against the layout so the rail does not block doors or nearby fixtures.
The extended position needs the same 12-to-18-inch reach zone as a fixed bar. The folded position needs clearance from the tank, the seat, and any cabinet or towel bar. A rail that folds into a door swing creates a hazard instead of removing one.
Best Rooms for Hinged Rails
Hinged rails fit bathrooms where a fixed bar would block a pathway. A narrow bath with a door that swings toward the toilet is a classic case. The rail stays folded during normal use and swings out only when the user needs it.
These rails also suit shared bathrooms. A household with one user who needs support and another who does not can keep the bar folded most of the time. The bathroom stays open and uncluttered, and the support appears on demand. The design rewards careful placement planning, because the mounting side and the reinforcement location must be settled before the first hole is drilled.
Stand-Alone Toilet Safety Rails
Floor Space and Portability
Stand-alone toilet safety rails rest on the floor and wrap around the fixture without touching the wall. The frame carries every load down through its legs, so the user gains support without drilling a single hole. This design makes stand-alone safety rails a strong fit for rentals, temporary recovery periods, and homes where the wall material cannot hold an anchor.
The floor footprint is the main trade-off. A freestanding frame extends outward on both sides of the toilet and needs clear floor area around the base. A toilet-mounted rail offers a compact alternative. It attaches to the toilet bolts and uses no floor space at all. The table below sets the two designs side by side.
| Consideration | Freestanding Safety Frame | Toilet-Mounted Safety Rail |
|---|---|---|
| Floor footprint | Larger — extends outward on both sides, requires floor clearance around the toilet | Compact — attaches to toilet bolts, uses no floor space |
| Portability | Highly portable — tool-free, push-button height adjustment, moves between bathrooms in minutes | Stays with the toilet — minimal assembly, not easily relocated |
| Best room layout | Bathrooms with ample clearance on both sides of the toilet; poor fit for cramped bathrooms where it narrows pathways | Small or tight bathrooms; keeps floor clear and approach to toilet natural |
| Best use case | Temporary recovery, bilateral weakness, heavier users | Long-term discreet daily use, one-sided weakness, mild balance concerns |
Portability is the second advantage. A freestanding frame moves between bathrooms in minutes, and many models adjust height with a push button and no tools. A toilet-mounted unit stays with the fixture it serves. Neither design wins on every count. The right pick depends on how long the user needs support and how much room the bathroom offers.
Portability should never compromise stability. A solid frame and non-slip feet are essential, because a frame that shifts under load creates a new hazard. Buyers should check the base width, the foot material, and the weight rating before they commit.
Best Rooms for Stand-Alone Rails
Room layout decides whether a frame helps or hurts. A bathroom with ample clearance on both sides of the toilet gives a frame room to sit level and stable. A cramped bathroom tells a different story. A full frame can narrow the pathways and make the toilet harder to approach, which creates new hazards in place of the old ones.
A toilet-mounted rail solves the tight-room problem. It keeps the floor clear and leaves the approach to the fixture natural. Households with one small hall bath often choose this route for long-term daily use.
Temporary recovery favors the frame. A user recovering from surgery for six to eight weeks often needs support on both sides, and a freestanding frame delivers it without permanent changes. Some households combine both designs. They place a frame in the primary bathroom and attachable toilet safety rails in a guest bath, so every user finds support where they need it.
Renters gain a clear benefit from non-permanent options. Foldable and freestanding designs allow support without drilling into walls or floors, and adjustable models maximize space efficiency. A renter can improve bathroom safety and still recover the deposit at move-out.
Comparing the Four Types
Space Efficiency Comparison
Each rail type claims a different part of the room. Floor-mounted frames claim floor area. Wall-mounted bars claim wall area and hidden framing. Hinged rails claim a swing arc. Stand-alone frames claim the largest floor footprint of the group, while toilet-mounted units claim almost none.
The comparison below ranks the four types by how much room each one demands.
| Rail Type | Floor Space Claimed | Wall Space Claimed | Swing or Reach Zone |
|---|---|---|---|
| Floor-mounted | High — legs sit beside the bowl | None | Moderate |
| Wall-mounted | None | Bar length plus flange room | Moderate |
| Hinged / fold-down | None when folded | Bar length plus bracket | High when extended |
| Stand-alone | High — frame surrounds the base | None | Moderate |
A small bathroom rewards the wall-mounted bar and the hinged rail. A large bathroom absorbs a floor-mounted or stand-alone frame without strain. The placement of each type should follow the room’s open zones, not the other way around.
Fit, Compliance, and Cost at a Glance
Fit, code compliance, and cost pull in different directions. Wall-mounted bars meet ADA figures most directly, because the code writes its rules around fixed wall hardware. Floor-mounted and stand-alone frames meet the same reach targets through their own geometry, and installers must verify the 12-to-18-inch zone from the bowl edge on each side.
Cost tracks complexity. A basic wall-mounted bar costs the least, and the price rises with length, finish, and heavy-duty anchors. Hinged rails cost more because of the pivot mechanism. Floor-mounted and stand-alone frames carry the highest price, and they also demand the most floor room.
Compliance depends on the installation, not the box. Every type can meet the 33-to-36-inch height range and the 1.5-inch wall gap when the installer measures with care. The location of the studs, the condition of the subfloor, and the actual clearance beside the toilet decide which type fits best. A buyer who matches the rail to the room gets safety, code compliance, and value in one package.
Grab Bar Placement at the Toilet: ADA and Building Code Requirements
ADA Side Clearance Rules
Required Distance From the Toilet Centerline
The ADA sets the toilet centerline at 16 to 18 inches from the adjacent side wall or partition. This range defines the space where a user sits and transfers. A fixture set outside this range leaves too little room on one side and wasted room on the other. Installers measure from the centerline, not the tank, to confirm compliance.
Required Distance From the Side Wall
The side wall itself carries the primary support. Grab bar placement at the toilet depends on this wall sitting within the 16-to-18-inch window. The table below pairs the two key ADA figures.
| Requirement | Measurement |
|---|---|
| Grab bar clearance from wall | 1½ inches minimum |
| Toilet centerline from adjacent side wall | 16″–18″ |
Grab Bar Height and Length
Height Range Above the Floor
ADA requires grab bars mounted 33 to 36 inches from the floor, measured to the top of the gripping surface. This height suits most seated users. A horizontal bar on the side wall must hold this height along its full run. Consistency in height, angle, and location keeps every bar within reach.
Minimum Length and Extension From Center
Length rules differ by wall. Beside the toilet, a 42-inch bar is standard on the side wall. The rear wall needs at least 36 inches, with 12 inches extending on one side of the centerline and 24 inches on the other.
The side wall grab bars must be at least 42″ long. The grab bars on the rear wall must be a minimum of 36″, extend at least 12″ on one side from the toilet centerline, and must be at least 24″ on the other side. Grab bars must be installed in a horizontal position, 33″ minimum and 36″ maximum above the floor measured to the top of the gripping surface.
Wall Gap and Projecting Objects
The 1.5-Inch Gap Between Wall and Bar
ADA fixes the gap between the bar and the wall at exactly 1½ inches. This is an absolute dimension, not a minimum, and it prevents entrapment of a hand or arm. The side wall bar must hold this gap along its entire length.
Clearance: 1-1/2 inches between the grab bar and the wall
Clearance Above Grab Bars
Projecting objects such as soap dispensers must sit at least 12 inches above the top of wall-mounted grab bars and at least 1½ inches from the bar’s bottom and ends. Other grab bars and shower controls may sit closer, with a 1½-inch minimum above the bar. Properly placed grab bars keep this zone clear. The most effective position for safety combines correct height with an unobstructed approach, and the location of every fixture near the toilet should respect these clearances.
Residential Code and Manufacturer Specs
Where Local Codes Differ From ADA
The ADA sets the standard for public and commercial bathrooms. Residential bathrooms follow a different rulebook. The International Residential Code (IRC) governs most one- and two-family homes, and it treats grab bars as an optional safety feature rather than a mandatory one. Many jurisdictions adopt the IRC with local amendments, and those amendments can shift the numbers.
A common residential figure places the toilet centerline 15 inches from the side wall. ADA raises that figure to 16 to 18 inches. Local inspectors sometimes accept the 15-inch layout in a private home, and sometimes they do not. The difference matters for rail placement, because a bar mounted on a wall that sits too close leaves a cramped reach zone.
| Requirement | ADA (Public) | Typical Residential Code |
|---|---|---|
| Centerline to side wall | 16–18 inches | 15 inches minimum |
| Grab bar height | 33–36 inches | Often follows ADA when installed |
| Wall gap behind bar | 1½ inches | 1½ inches when specified |
Homeowners should confirm the local rule before ordering hardware. A call to the building department takes minutes and prevents a failed inspection.
Reading the Manufacturer’s Clearance Chart
Every rail manufacturer publishes a clearance chart or installation guide. The chart lists the mounting height, the bar length, the wall gap, and the reach zone from the bowl edge. The height figure usually falls between 33 and 36 inches, measured to the top of the gripping surface.
The chart also states the minimum bar length for each position. A horizontal bar on the side wall typically runs 42 inches, and the 42-inch bar must extend far enough past the centerline to serve a seated user. The location of the mounting flanges determines how much stud space the installer needs.
Buyers should read the chart against their own measurements. The safety of the finished installation depends on matching the published figures to the actual room. A chart that calls for 18 inches of clear wall space will not work on a wall that offers 14. Measure twice, then confirm the numbers against the guide.
Fitting Safety Rails in a Small Bathroom

When the Full Clearance Is Not Available
Compact and Space-Saving Rail Options
Small bathrooms rarely offer the full 30-inch clearance beside the toilet. Compact rail designs solve this problem without sacrificing support. A toilet-mounted rail attaches to the fixture bolts and claims no floor area. Hinged rails fold flat against the wall when idle. Both options deliver space-saving support in rooms where a fixed bar would crowd the walkway.
Adjusting the Layout Instead of the Rail
Sometimes the room layout needs a small change rather than a smaller rail. Moving a towel bar, a shelf, or a wastebasket opens the reach zone beside the fixture. Homeowners should clear the area within 18 inches of the bowl edge before they shop for hardware. A clear zone often makes a standard rail work in a room that seemed too tight.
Toilet Placement Adjustments
Shifting the Toilet for More Side Room
A toilet that sits too close to a side wall limits every rail option. Relocating the fixture gains more floor space and opens the clearance zone. This step requires a plumber and a flooring repair, and the cost runs higher than a rail swap. Homeowners should weigh the expense against the long-term benefit before committing.
Working With Fixed Plumbing
Many bathrooms have a slab foundation or a cast-iron drain stack. These conditions make relocation impractical. The placement of the fixture stays fixed, and the rail must adapt instead. A hinged or toilet-mounted design fits this scenario well. The rail provides safety without demanding a plumbing project.
Alternatives for Tight Spaces
Toilet-Frame and Support-Arm Styles
A support-arm frame sits beside the bowl and braces against the floor. The design offers stable support in a narrow footprint. Attachable toilet safety rails work in the tightest rooms because they clamp to the fixture itself. Both styles let users skip the wall anchor and the stud hunt.
When to Consult a Professional
A contractor or an occupational therapist adds value when the room defies every standard option. These experts assess the actual clearance, the user’s reach, and the fixture placement. They can recommend a custom solution or confirm that a standard rail will work. A professional visit costs less than a failed installation.
Installation Considerations That Affect Space
Wall Reinforcement and Blocking
Locating Studs Behind the Rail
Solid framing decides where a rail can go. Installers can find studs with a few reliable methods:
- Slide a magnet across the wall and mark each spot where it sticks, then scan vertically to confirm a line of fasteners.
- Follow the architecture. Trim carpenters nail casings, baseboards, and shoe molding directly into framing, so consistent nail lines reveal solid wood.
- Drill a small test hole with a 1/16-inch bit. Steady resistance means solid framing, and a sudden give means lath with no stud behind it.
- Insert a straightened stiff wire into the pilot hole and sweep it side to side to feel where the wood begins.
Adding Blocking in Finished Walls
When no stud sits at the target location, blocking fills the gap. Solid wood blocking fits between the studs or lets into them, flush with the stud face. Plywood serves larger areas and allows flexible placement of wall-mounted grab bars. A formed metal plate offers another option, and crews can screw or spot weld it to the studs. Wall anchors designed for grab bars distribute weight when framing stays out of reach. A contractor handles this work when the wall condition is uncertain.
Floor Space and Mounting Surface
Clear Floor Area for Floor-Mounted Rails
Floor-mounted frames need open floor to sit level. The clear area must stay free of bins, shelves, and planters at inspection time.
| Requirement | Dimension |
|---|---|
| Minimum clear width for side transfer | 60 inches |
| Clear depth, wall-hung toilet | 56 inches |
| Clear depth, floor-mounted toilet | 59 inches |
Checking the Subfloor and Thresholds
A toilet that rocks signals an unsound subfloor, and the mounting surface must be verified as level before any frame goes down. Thresholds also matter. Any vertical lip higher than 1/4 inch needs a bevel, up to a maximum of 1/2 inch, so wheels and feet pass without catching.
Measuring Before You Buy
A Simple Measuring Checklist
A careful measurement protects the safety of every user. The installer records the distance from the toilet centerline to each side wall, the reach zone from the bowl edge, and the mounting height range of 33 to 36 inches. The location of each stud belongs on the list as well. These figures guide the final purchase.
Common Measuring Mistakes to Avoid
Two errors recur. Some buyers measure from the tank or seat edge instead of the centerline, and the placement figures come out wrong. Others skip the stud check and assume framing sits behind the tile. Both mistakes surface during grab bar installation, when the hardware no longer fits the wall. A second pass with the tape prevents them.
The baseline answer to how much space is needed beside a toilet is 30 inches from the centerline to the nearest obstruction, with the rail mounted 12 to 18 inches from the bowl edge. Rail type changes the space picture, so match the rail to the room rather than forcing the room to fit the rail. ADA and local codes set the minimums, including the 1.5-inch wall gap and the 33-to-36-inch height, and manufacturer specs fill in the details. Properly installed grab bars cut bathroom fall risk by roughly 40 percent. Measure twice, confirm wall support, and choose toilet safety rails that fit the actual clearance. Careful placement and correct height deliver lasting safety.
FAQ
How much space does a toilet need beside it for safety rails?
Plan for at least 30 inches from the toilet centerline to the nearest wall or obstruction. This baseline gives the user room to sit, stand, and pivot. Local codes and rail manufacturers may adjust the figure, so confirm the requirement before ordering hardware.
Where does the installer measure from when checking clearance?
The installer measures from the toilet centerline, not the tank or the seat edge. The centerline stays constant across every toilet model. Tank widths and seat positions vary, so those points produce unreliable numbers. A tape anchored at the centerline gives a repeatable result.
How far should the rail sit from the toilet bowl edge?
Keep the rail within 12 to 18 inches of the bowl edge. This range places the bar inside a seated user’s natural reach. A closer bar crowds the arm and hip. A farther bar forces a stretch that undermines the support.
What height and wall gap do ADA rules require?
ADA requires a mounting height of 33 to 36 inches, measured to the top of the gripping surface. The gap between the bar and the wall must measure exactly 1½ inches. This gap prevents hand and arm entrapment during a transfer.
Which rail type works best in a small bathroom?
A toilet-mounted rail or a hinged fold-down rail suits tight rooms. Both designs keep the floor clear and preserve the walkway. A wall-mounted bar also saves floor space when solid framing sits behind the finish. Floor-mounted frames need the most open floor area.
Does a wall-mounted grab bar need a stud behind it?
Yes. A wall-mounted bar must anchor into solid framing or approved blocking. Drywall alone will not hold a user’s full weight. When no stud sits at the target location, the installer adds blocking or uses heavy-duty anchors rated for grab bar loads.
Can a renter install toilet safety rails without drilling?
Yes. Stand-alone frames and toilet-mounted rails need no wall anchors. Both designs carry the load through the floor or the fixture bolts. Renters gain support and still recover the deposit at move-out. Stability checks matter before use.
What happens when the bathroom cannot meet the full clearance?
Compact rails and layout adjustments solve most tight-room problems. Clearing shelves or bins within 18 inches of the bowl edge often restores the reach zone. A contractor or occupational therapist can assess the space when standard options fail.
