
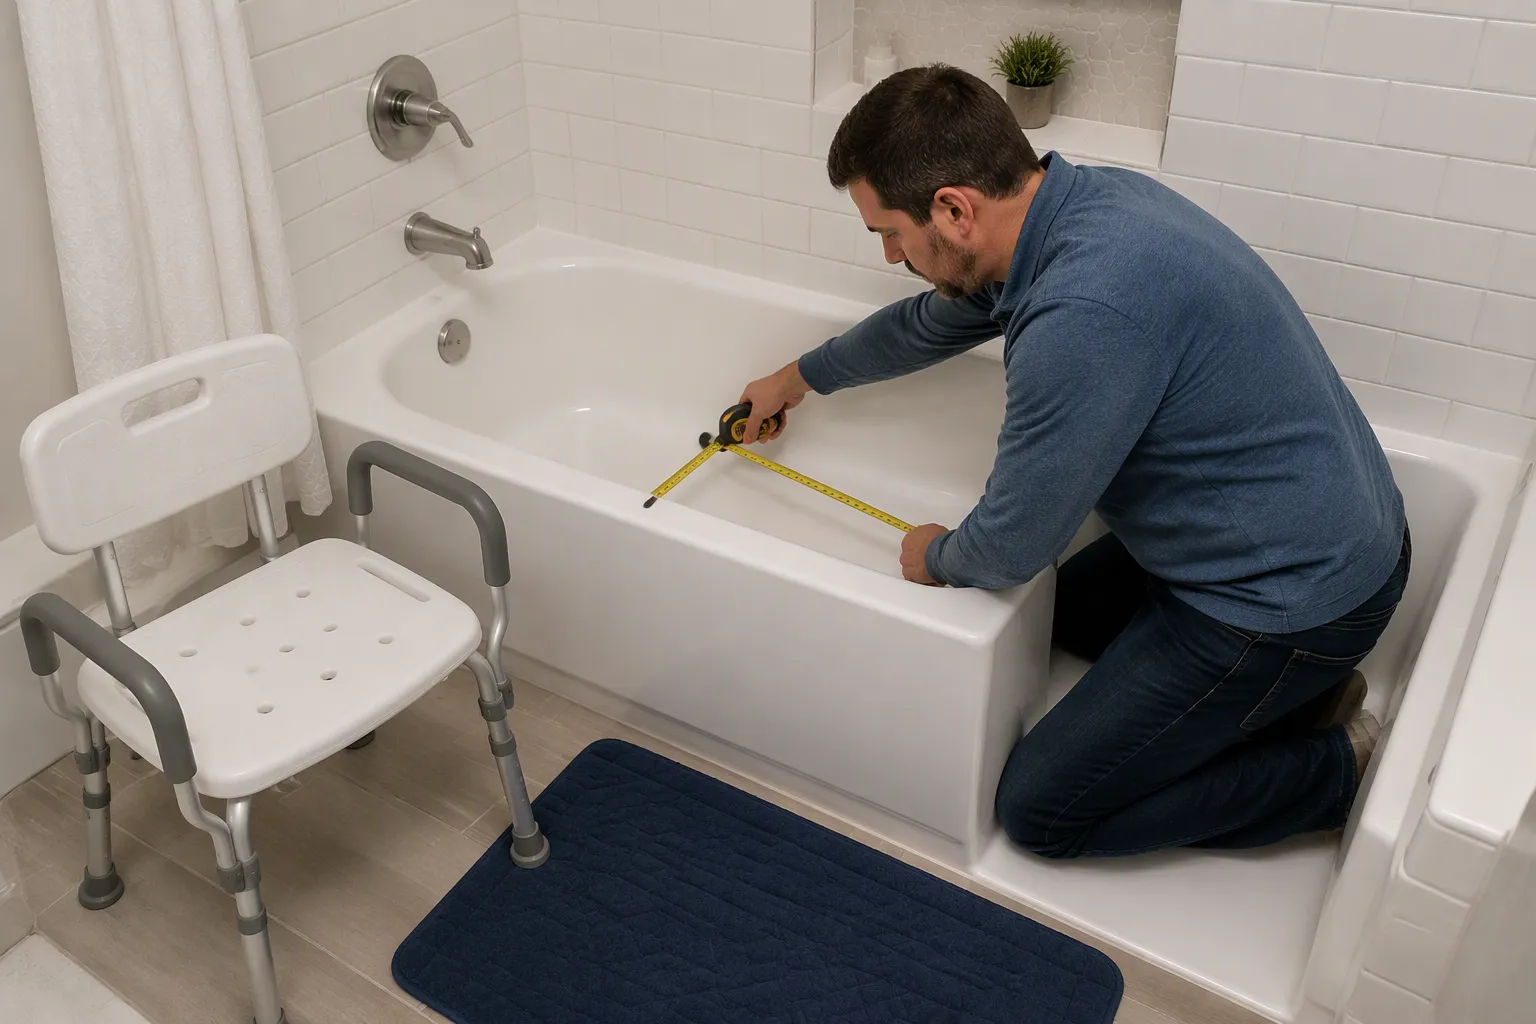
A shower chair fit bathtub depends on one key factor: the chair base must sit smaller than the usable floor area inside the tub. The process involves three simple steps. First, measure the interior of the bathtub. Next, measure the base of the shower chair. Finally, compare both sets of numbers. A standard tape measure and a few minutes are all anyone needs. This task matters for safety. A proper fit prevents falls and ensures comfort. Many shower chairs, shower seats, and shower benches work well when the size matches correctly. A shower bath chair that sits level and stable keeps the user secure. Never rush this step. A wobbly chair creates real danger.
Measuring Your Bathtub’s Interior
Accurate measurements form the foundation of a safe shower chair fit. A person should measure the usable floor area inside the bathtub, not just the overall tub size. The feet of the chair must rest fully on a firm, level surface. Curves, drain lips, or unstable mats create dangerous conditions. This step requires careful attention to detail.
Tools You’ll Need for Accurate Measurements
Gathering the right tools before starting makes the process efficient. A few basic items ensure precise results.
Tape Measure
A standard retractable tape measure works well for this task. A metal blade offers rigidity for longer measurements. A cloth tape provides flexibility for curved surfaces. Either type delivers accurate readings when used properly. A tape measure with a locking mechanism helps when working alone.
Notepad and Pen
Recording measurements immediately prevents memory errors. A simple notepad and pen suffice. Some people prefer a smartphone notes app. The key is writing down each number as it is taken. Labeling each measurement clearly avoids confusion later.
Level (Optional but Helpful)
A small spirit level helps assess the floor’s flatness. This tool reveals slopes or uneven areas inside the tub. A level is not strictly necessary for basic measurements. However, it provides valuable information about the tub’s surface. A person can also use a level to check the chair’s stability after placement.
Measuring the Width of Your Bathtub Floor
Width measurements determine if a shower chair can fit side to side. This dimension often varies along the length of the tub. Careful measurement at multiple points ensures accuracy.
Finding the Narrowest Point
The narrowest point of the tub floor dictates the maximum width for a chair. This point often occurs near the drain or at curved sections. A person should slide the tape measure along the entire length of the tub. The smallest number represents the critical width constraint. Shower chairs must fit within this narrowest section.
Recording the Width at the Front and Back
Width often differs between the front and back of the tub. Measuring at both locations provides a complete picture. The front edge may be wider than the back wall area. Some tubs narrow toward the drain end. Recording both numbers helps when comparing against the dimensions of the shower chair. A person should note any significant variation between these two measurements.
Measuring the Length of Your Bathtub Floor
Length measurements determine if the chair fits from front to back. This dimension affects how much legroom remains after placement. Accurate length measurement prevents surprises during the dry run test.
Measuring from the Back Wall to the Front Edge
A person should extend the tape measure from the back wall to the front rim. The tape should lie flat against the tub floor. This measurement captures the full usable length. Some tubs include a ledge or overflow drain that reduces usable space. A person should measure to the actual front edge, not the outer rim.
Accounting for Curved or Angled Ends
Many bathtubs feature curved or angled ends. These shapes reduce the usable floor area. A person should measure the flat section separately from the curved sections. The chair must sit entirely on the flat portion for stability. Measuring only the longest point gives a false sense of available space. A person should identify the largest rectangle that fits within the tub floor. This rectangle represents the true usable area for the chair.
To measure your bath/shower space correctly, follow these three steps:
- Measure the inside width of the tub or shower floor.
- Measure the height of the tub wall.
- Measure the clear floor space outside the tub.
These measurements provide the essential data for assessing shower chair compatibility. A person should also measure the tub wall, floor area on both sides of the tub, and the approach path. Confirming that the curtain or enclosure remains compatible prevents installation problems. Ensuring every leg of the chair contacts its intended surface securely guarantees safety. The bottoms of the chair legs must rest on flat, stable surfaces. These additional measurements create a complete picture of the bath/shower space.
Understanding Bathtub Depth and Height
Depth and height measurements reveal how much vertical space the tub offers. These numbers determine whether a shower chair sits too high or too low inside the basin. A person should measure depth at two key locations for a complete picture.
Measuring the Depth at the Drain
The drain area often represents the deepest point of the tub. A person should place the tape measure straight down from the rim to the floor at the drain. This measurement shows the maximum water depth. It also indicates how far the chair legs must extend to reach the bottom.
Measuring the Depth at the Back Wall
The back wall depth typically runs shallower than the drain area. A person should repeat the vertical measurement at the back wall. This number helps assess the slope across the tub floor. Comparing this figure to the drain depth reveals the total drop.
Calculating the Slope or Drop
Subtracting the back wall depth from the drain depth yields the slope. A significant drop means the floor tilts toward the drain. Shower chairs with adjustable legs can compensate for this angle. A person should note this number before selecting a chair. A steep slope may make some shower chairs unstable.
Identifying the Shape of Your Bathtub Floor
Floor shape affects how well a shower chair sits inside the tub. Flat surfaces offer the best stability. Curves, textures, and ridges create challenges for the bottoms of chair legs.
Flat vs. Curved Floors
A flat floor allows all four chair legs to contact the surface evenly. Curved floors leave gaps under some legs. A person should place a straightedge across the floor to check for curves. Shower chairs with suction cups or rubber feet may still work on gentle curves. Severe curves often require a different seating solution.
Textured or Non-Slip Surfaces
Many tubs feature textured floors for safety. These surfaces improve grip for bare feet. They also affect how chair feet behave. Rubber feet grip well on textured surfaces. Suction cups may struggle to seal on rough or bumpy floors. A person should test the chair feet on the actual surface before use.
Built-in Contours and Ridges
Some bathtubs include built-in contours or ridges near the drain. These features channel water toward the drain. They also create uneven spots on the floor. A chair leg resting on a ridge may lift other legs off the surface. A person should identify these features and measure around them. The chair must sit on the flattest available area for safe use.
Measuring the Shower Chair’s Base
A shower chair’s base determines whether it fits inside a bathtub. A person should measure this base carefully before making a purchase. The numbers must match the tub’s usable floor area.
Understanding the “Footprint” of a Shower Chair
The footprint represents the total space a chair occupies at floor level. This measurement includes the span of the legs, not just the seat.
Defining the Base Dimensions
The base dimensions cover the width and depth of the leg span. A person should measure the distance between the outermost points of the legs. This figure often exceeds the seat dimensions. Manufacturers list these numbers in product specifications.
Why the Footprint Matters More Than the Seat Size
A shower seat may offer a generous seat size and shape, yet the base may not fit a narrow tub. The legs splay outward for stability. This splay increases the total footprint. A person should always compare the base to the tub floor, not the seat. A shower bench with a wide seat may still fail if its legs cannot rest on the floor properly.
How to Measure the Leg Span
Accurate leg measurements prevent fitting problems. A person should extend the tape measure between the outer edges of the legs.
Measuring Front-to-Back Distance
This measurement runs from the front legs to the back legs. A person should place the tape at the outermost edge of each leg. This number shows how much depth the chair requires.
Measuring Side-to-Side Distance
This measurement captures the width across the chair. A person should measure from the left leg to the right leg at the widest point. This figure must fit within the tub’s narrowest section.
Measuring Diagonal Distance for Stability
Diagonal measurements reveal the chair’s stability pattern. A person should measure from one front leg to the opposite back leg. Comparing both diagonals confirms the frame sits square.
Checking Adjustable Legs and Feet
Adjustable features help a shower chair fit uneven tub floors. A person should understand these options before buying.
Understanding Leg Extensions and Height Adjustment
Many shower chairs include telescoping legs. These extensions change the seat height to match user needs. A person should check the adjustment range against the tub’s depth.
Measuring the Range of Adjustment
The adjustment range shows the minimum and maximum height. A person should measure this range with the tape. The lowest setting must reach the tub floor. The highest setting must suit the user’s comfort.
Types of Feet (Suction Cups vs. Rubber)
Suction cups grip smooth surfaces tightly. Rubber feet work better on textured floors. A person should match the foot type to the tub surface.
To measure a shower chair’s base correctly, follow these steps:
- Measure the interior dimensions of the tub at the floor level where the chair legs will sit.
- Compare those measurements to the chair’s footprint, including the space the legs splay outward.
- Leave at least an inch of clearance on each side so the chair is not wedged against the walls.
The main trade-off is width. At one of the roomiest seats in its class, the KingPavonini may not fit inside every bathtub, especially older, narrower models. Measure your tub or shower stall before ordering—we cannot stress this enough. If space is tight, the HOMLAND or a basic backless stool may be a better geometric fit.
Weight Capacity and Frame Size
Weight capacity and frame size work together to determine a shower chair’s safety and fit. A sturdy frame supports the user’s weight without bending or flexing. A wider frame offers more stability but demands more floor space. A person must balance these factors against the bathtub’s interior dimensions.
How Weight Capacity Affects Frame Width
A higher weight capacity typically requires a wider, reinforced frame. Manufacturers add thicker tubing and broader leg spans to handle greater loads. This added width increases the overall size of the chair. A heavy-duty shower chair may not fit inside a narrow tub for this reason. A person should measure the tub’s narrowest point before selecting a high-capacity model. The frame width must remain smaller than the tub floor at every point. A bariatric shower chair often measures several inches wider than a standard model. This extra width provides stability for larger users. It also creates fitting challenges in compact bathrooms. A person must verify that the chair’s footprint fits within the available space. The seat dimensions also matter for comfort and safe transfers. A seat that is too wide may prove difficult to position correctly in a smaller tub. The chair should be wide enough for comfort but not excessively large.
Checking the Manufacturer’s Specifications
Manufacturer specifications provide the most reliable data for fit and safety. A person should review these details before making a purchase. The following steps help ensure a proper match:
- Confirm the chair is specifically designed and approved for bathtub use, and that it fits the tub safely.
- Check the manufacturer’s stated maximum user weight and ensure it meets the intended user’s needs without exceeding the stated capacity.
- Verify seat dimensions (width and depth) to confirm comfort and fit.
- Confirm the product dimensions and tub compatibility, including tub width and wall height for transfer benches.
- Review the manufacturer’s installation requirements before purchase.
Weight capacity is an essential safety specification, not a suggestion. A person should choose a shower chair whose stated maximum user weight comfortably exceeds the intended user’s body weight. Never exceed the manufacturer’s stated limit. A person should also verify whether the capacity applies to the complete product configuration. Some manufacturers list capacity for the frame alone. Others include the seat and accessories in their rating. This distinction affects real-world safety. A person should also check the height range for adjustable legs. The lowest setting must reach the tub floor. The highest setting must suit the user’s comfort. These specifications ensure a safe and functional fit.
Comparing Measurements for a Proper Shower Chair Fit Bathtub
A person now holds two sets of numbers. One set describes the bathtub interior. The other set describes the shower chair base. The next step involves placing these numbers side by side. This comparison reveals whether the chair will fit. It also shows how stable the chair will remain during use. A careful comparison prevents costly returns and dangerous accidents.
The Golden Rule: Chair Base vs. Bathtub Floor
One principle governs every fitting decision. The chair base must measure smaller than the bathtub floor. This rule sounds simple. Yet many people overlook it. They focus on seat dimensions or overall product photos. The base tells the real story.
Ensuring the Chair is Smaller Than the Tub
The chair footprint must fit inside the usable floor area. A person should compare the narrowest tub width against the widest part of the chair base. The chair must also fit from front to back. Every leg must rest on a flat surface. A shower chair fit bathtub succeeds only when these conditions hold true. A chair that touches the walls on both sides cannot sit flat. The legs may ride up on the curved sides. This situation creates a dangerous tilt.
Leaving a Safety Margin (1-2 Inches on Each Side)
A proper fit requires breathing room. A person should leave one to two inches of clearance on each side. This margin allows for slight shifts in position. It also accommodates the natural curve of the tub walls. A chair wedged tightly against the sides may seem secure. In reality, this tight fit prevents all four feet from contacting the floor. A small gap ensures the chair sits flat. The margin also makes removal and cleaning easier.
Accounting for Curved or Sloped Floors
Bathtub floors rarely measure perfectly flat. Most tubs slope toward the drain. Many feature curved transitions where the floor meets the walls. These shapes affect how a shower chair sits.
How Slope Affects the Chair’s Levelness
A sloped floor tilts the chair. Even a slight slope can lift one or two legs off the surface. The chair then rocks or wobbles. This movement creates instability. A person sitting down or standing up may shift weight suddenly. A tilted chair cannot support that movement safely. The seat itself may also tilt. A tilted seat forces the user to compensate with muscle effort. This compensation makes standing harder and less safe.
Adjusting Legs to Compensate for Slope
Many shower chairs include adjustable legs. These legs extend or retract to different lengths. A person can set each leg individually. This feature allows the chair to sit level on a sloped floor. The inner legs may need to sit shorter than the outer legs. This adjustment compensates for the height difference between the tub floor and the bathroom floor. A transfer bench often allows precise height adjustment in small increments. Some models adjust in quarter-inch steps across a sixteen to twenty-three inch range. This precision helps achieve a level seat.
When a Slope Makes a Chair Unusable
Some slopes prove too steep for adjustment. A person should measure the drop from the back wall to the drain. A drop of more than two inches often signals a problem. The adjustable legs may not extend far enough. The chair may still tilt despite maximum adjustment. In these cases, a different seating solution may work better. A transfer bench offers one alternative. This design places two legs on the bathroom floor outside the tub. The wider base of support avoids the tapered tub-floor problem entirely. A shower bench with a different leg configuration may also help.
Checking Weight Distribution and Stability
Weight distribution determines how safely a chair performs. A stable chair keeps its center of gravity within the base of support. An unstable chair tips when weight shifts.
Understanding the Center of Gravity
The center of gravity represents the point where a person’s weight concentrates. This point shifts during movement. Standing up moves the center of gravity forward. Sitting down moves it backward. A stable chair keeps this point within the footprint at all times. Most bathtubs taper inward toward the bottom. This geometry reduces the base of support for a four-legged shower chair. The legs cannot sit flat on the tub floor. Instead, the legs splay outward at an unsafe angle. The chair then balances precariously on the edges of its rubber feet. Any shift in the user’s weight can cause the chair to slip, tilt, or collapse. A person should adjust the seat height so the hips sit slightly higher than the knees. This downward-sloping thigh angle shifts the center of gravity forward. This position makes standing easier and safer. A seat that sits too low forces more muscular effort. This extra effort can make standing less safe.
Ensuring All Four Feet Contact the Floor
All four feet must touch the tub floor. This contact creates the base of support. A person should check each foot after placing the chair. The rubber feet must sit fully flat on the surface. Twisted or misaligned feet can slip. A person should also confirm that all four legs are level. This step prevents rocking on the shower floor. The following measurements help verify proper contact:
| Measurement Point | Why It Matters | Common Error |
|---|---|---|
| Internal width at tub bottom | Chair legs must fit flat here, not on the curve; this is the most critical dimension for shower chair stability. | Measuring only the tub width at the top edge and assuming it is uniform. |
| Height of tub wall | Determines the leg adjustment range needed for a transfer bench to sit level across the wall. | Forgetting to measure from the tub floor to the top of the wall, causing a tilted bench. |
| Distance from floor to inner curve | The tub’s inner curve affects the stability angle of chair legs; a larger radius leaves less flat surface. | Ignoring curved surfaces where the tub floor meets the walls and placing legs on an unstable incline. |
Testing for Rocking or Wobbling
A simple test reveals stability problems. A person should press down on each corner of the seat. Any movement signals a problem. The chair should remain solid with no rocking. A wobble means one or more legs fail to contact the floor. A person should adjust the legs and retest. This process continues until the chair sits firm. A person should also keep the transfer path clear. Loose rugs, baskets, and clutter create tripping hazards. The chair should face the correct direction for the user’s usual movement pattern. These steps ensure a proper shape, size, and height for safe use. A shower seat that fits the tub or shower correctly provides security and comfort. A shower chair that fits the tub or shower properly protects the user from falls. Taking time to verify stability pays off in safety and peace of mind.
Clearance for Your Body and Movement
A proper shower chair fit bathtub depends on more than base dimensions alone. The user needs adequate room to sit, shift, and stand. Clearance affects comfort and safety during every use. A chair that fills the entire tub floor leaves no room for the body. The user may feel trapped or struggle to move freely. This section explains how to assess clearance for legs and movement.
Leaving Room for Your Legs
Legroom determines how comfortably a person sits in the shower chair. The user needs space to position both legs without cramping. A chair placed too close to the front edge restricts leg movement. The knees may press against the tub wall. This pressure causes discomfort during longer showers. A person should measure the distance from the front edge of the seat to the inside wall of the tub. This measurement reveals the available legroom. A minimum of twelve inches of legroom provides basic comfort for most users. More room allows greater freedom of movement. The user can stretch or reposition the legs as needed. A person with limited mobility may need additional legroom for safe transfers. The chair position within the tub affects this measurement. Placing the chair toward the back wall creates more legroom at the front. However, this placement may reduce stability on a sloped floor. A person must balance these competing needs. The goal is a stable chair with enough room for comfortable leg positioning.
The height of the chair seat also affects legroom. A seat that sits too low forces the knees upward. This position strains the hips and lower back. A seat that sits too high leaves the feet dangling. The user cannot plant the feet firmly on the tub floor. This instability makes standing difficult and dangerous. A person should adjust the seat height so the feet rest flat on the floor. The knees should bend at a comfortable angle. This angle typically measures slightly less than ninety degrees. This position supports safe standing and sitting. The user can rise with less effort. The risk of slipping or falling decreases.
Space for Turning and Transferring Safely
Movement within the tub requires adequate clearance around the chair. The user must turn the body to reach different areas. The user must also transfer into and out of the chair safely. These actions demand more room than static sitting. A person should assess the available space on all sides of the shower chair. The front area matters most for transfers. The user steps into the tub and lowers onto the seat. This motion requires clear space in front of the chair. The user needs room to position the feet and shift weight. A cramped entry point increases fall risk. The sides of the chair also need clearance. The user may need to turn the torso to wash the back or legs. Limited side clearance restricts these movements. The user may strain muscles while reaching. This strain can cause loss of balance.
Shower chairs with arms add another consideration. The arms help the user push up during standing. They also provide a secure handhold during transfers. However, arms increase the overall width of the chair. This extra width reduces the available clearance inside the tub. A person must account for this added dimension. The chair arms must not press against the tub walls. Contact with the walls may prevent proper positioning. The user may struggle to sit or stand with the arms blocked. A person should measure the width across the chair arms. This measurement must fit within the tub’s narrowest point. A safety margin of one to two inches on each side ensures proper clearance. This margin allows the chair to sit flat without wedging.
The transfer path outside the tub also matters. The user approaches the tub from the bathroom floor. This path must remain clear of obstacles. Rugs, towels, and bathroom accessories create tripping hazards. A person should remove these items before using the shower chair. The user needs a stable surface to stand on during the transfer. A non-slip bath mat outside the tub provides secure footing. The user can then step into the tub with confidence. The height difference between the bathroom floor and the tub floor affects the transfer. A high tub wall requires more effort to step over. A transfer bench may work better in these situations. This design allows the user to sit on the bench outside the tub. The user then slides across the bench into the tub. This method reduces the need for stepping over the wall. It also requires extra floor space outside the tub. A person should measure this area before choosing a transfer bench. The available space must accommodate the bench legs and the user’s body.
The direction of entry also affects clearance needs. Some users prefer to enter the tub facing the back wall. Others prefer to enter sideways. Each method requires different clearances. A person should consider the user’s typical movement patterns. The chair should face the direction that feels most natural and safe. This orientation reduces awkward twisting during transfers. The user can move with greater confidence and control. A person should test different chair positions during the dry run. This test reveals any clearance problems before actual use. Adjustments made during the dry run prevent accidents later. The goal is a safe, comfortable fit that supports independent bathing.
Tips for Ensuring a Secure Fit in Your Bathtub
Using Non-Slip Accessories
Non-slip accessories add a critical layer of safety for any shower chair placed inside a bathtub. These products reduce movement and improve grip on wet surfaces.
Adding Rubber Mats Under the Chair
A rubber mat with a suction-cup backing grips the tub floor securely. The mat should feature a textured surface with adequate coverage. Antimicrobial materials prevent mold growth in damp conditions. Correct sizing ensures the mat lies flat without curling. Curled mat edges create tripping hazards and can prove worse than no mat at all. Adhesive textured strips applied directly to the tub floor offer a permanent alternative for users who find loose mats unstable.
Using Suction Cup Feet for Extra Grip
Suction cup feet on shower chairs provide strong adhesion on smooth surfaces. These feet work best on flat, non-textured tub floors. A person should press each foot firmly to create a proper seal. Rubber feet offer better performance on textured or rough surfaces. The choice between suction cups and rubber depends on the specific tub floor material.
AARP explicitly states that suction-cup handles are not suitable substitutes for properly anchored grab bars. Under real body-weight pressure — especially during a fall attempt — suction mounts can fail. Bars should be anchored into wall studs or appropriate backing, ideally by a professional installer.
Grab bars must be anchored into wall studs or appropriate structural backing, never tile adhesive or suction cups. Standard accessibility guidance recommends horizontal placement at 33–36 inches from the floor, with a vertical bar at the entry point. Professional installation is strongly recommended so bars can safely bear body weight during a fall.
The “Dry Run” Test
A dry run test reveals fit and stability problems before any water enters the equation. This simple procedure takes only a few minutes and prevents accidents.
Placing the Chair in an Empty Bathtub
A person should place the shower chair inside the dry tub at the intended position. The chair must sit entirely on the flat floor area. All four legs should contact the surface evenly.
Checking for Movement and Slippage
A person should push the chair gently from each side. Any sliding or wobbling signals a problem. The chair should remain solid and stationary. A person should also check that the chair does not rock when weight shifts from side to side.
Simulating a Seated Position
A person should sit on the shower seat and practice standing up. This action tests the chair under realistic conditions. The chair should remain stable throughout the movement. A spotter should stand nearby for the first attempt.
Adjusting the Chair for Your Bathtub
Proper adjustments ensure the chair sits level and secure inside the tub. Most shower chairs offer adjustable features for this purpose.
Setting Leg Heights Individually
A person should adjust each leg to match the tub floor’s slope. The legs near the drain may need slight extension. Individual adjustment compensates for uneven surfaces. This step ensures all four feet contact the floor.
Locking Adjustable Mechanisms
Every adjustable mechanism must lock firmly into place. A person should twist or snap each locking pin until it clicks. Loose adjustments allow the chair to shift during use. A person should test each lock by pressing down firmly on the seat. The height setting should remain fixed under weight. A shower bench with locked legs provides reliable support for every user.
When to Consider a Different Shower Chair
Some bathtubs simply cannot accommodate certain shower chair models. A person should recognize the warning signs early. This awareness prevents wasted money and dangerous situations. Three common problems signal the need for a different product.
If the Chair is Too Wide
A chair that touches both tub walls cannot sit flat. The legs ride up on the curved sides. This position creates a dangerous tilt. A person should measure the narrowest point of the tub floor. The chair base must measure smaller than this number. A safety margin of one to two inches on each side ensures proper clearance. A compact shower chair with a base width of 13 to 14 inches fits most narrow tubs. Standard shower chairs often measure 18 inches or wider at the base. These larger models work well in spacious tubs. They fail in compact spaces. A person should check the product specifications before buying. The seat width also matters for comfort. A 12.5-inch seat provides adequate room for most users. A wider seat may not fit inside a narrow tub.
If the Chair is Too Tall
Seat height affects safety and comfort during every use. A shower seat that sits too high leaves the feet dangling. The user cannot plant both feet firmly on the tub floor. This instability makes standing difficult and dangerous. A seat that sits too low forces the knees upward. This position strains the hips and lower back. A person should check the adjustable height range of any shower chair. Many models adjust from 13.7 to 20.7 inches. This range suits most bathtubs and users. A person should measure the tub depth before selecting a chair. The lowest setting must reach the tub floor. The highest setting must suit the user’s leg length. A shower bench with the wrong height range creates problems. The user may struggle to sit or stand safely.
If the Bathtub is Too Narrow
Some bathtubs cannot fit any standard shower chair. Very small tubs may measure less than 24 inches wide at the floor. These spaces leave no room for a four-legged chair. A person should consider alternatives in these situations. A transfer bench places two legs outside the tub. This design works well for narrow spaces. A backless stool offers another option. These compact designs fit where larger chairs cannot. A person should measure the tub carefully before giving up. Some compact shower chairs fit spaces as narrow as 13 inches. The following table summarizes key specifications for narrow tub applications.
| Specification | Measurement |
|---|---|
| Base width (minimum seat height) | 13″ |
| Base width (maximum seat height) | 14″ |
| Seat width | 12.5″ |
| Seat height range | 13.7″ to 20.7″ |
| Compact base (fits narrow tubs/showers) | 13″–14″ |
A person should always verify these numbers against the actual tub dimensions. A proper fit ensures safety and comfort for every user.
Special Considerations for Unusual Bathtubs
Not every bathtub follows the standard rectangular design. Walk-in tubs, corner tubs, garden tubs, and models with built-in seats each present unique measurement challenges. A person must adjust the approach for these unusual shapes.
Walk-In Tubs and Shower Chairs
Walk-in tubs feature a door for easy entry. This design changes how a shower chair fits inside the basin.
Measuring the Door Opening
The door opening limits access to the tub interior. A person should measure the door width and height carefully. The shower chair must pass through this opening during placement. A narrow door may prevent larger models from entering. Compact shower chairs with removable parts offer one solution.
Checking the Interior Bench
Most walk-in tubs include a built-in bench. This bench occupies part of the interior floor. A person should measure the remaining floor area. The shower chair must fit within this reduced space. Some users find the built-in bench sufficient without an additional chair.
Corner Tubs and Garden Tubs
Corner tubs and garden tubs feature curved or angled shapes. These designs create measurement complications.
Measuring the Curved Sections
Curved walls reduce the usable floor area. A person should measure the flat section at the bottom. The chair must sit entirely on this flat portion. Curved sections cannot support chair legs properly.
Finding the Flattest Area
A person should locate the flattest spot on the tub floor. This area typically sits near the drain or center. The shower chair should rest on this surface. A shower bench with adjustable legs may help on slightly uneven floors.
Tubs with Built-in Seats
Some bathtubs include a molded seat as part of the design. This feature affects available floor space and seating options.
Using the Built-in Seat vs. a Chair
Built-in seats can reduce available floor space, which is especially problematic when a roll-in shower chair is needed. A no-step roll-in shower without a built-in seat provides extra floor space for maneuvering and entering without obstruction. If a built-in seat is not right for the user and another seat is recommended, placing that seat in front of the built-in one may leave too little room for the person and the seat. Built-in seats may be appropriate for temporary needs or for people with cardio-respiratory issues but no mobility concerns. Because designs and user needs vary, built-in seats are neither always a poor choice nor always a great one.
Built-in benches occupy part of the shower area, so in compact showers a corner seat can be a more space-efficient choice than a full bench.
Measuring the Available Floor Space
A person should measure the floor area not covered by the built-in seat. This measurement reveals whether a shower chair will fit. The remaining space must accommodate the chair base with a safety margin. If the area proves too small, the built-in seat may serve as the primary seating option.
Very Small or Compact Bathtubs
Compact bathtubs present unique challenges for anyone seeking a safe seating solution. These smaller basins often measure far less than standard models. A person must understand the minimum space requirements before purchasing any equipment. Proper planning prevents wasted money and dangerous fitting attempts.
Minimum Tub Dimensions for a Chair
A shower chair requires adequate floor space to sit level and stable. The minimum width for most standard models measures approximately 24 inches at the tub floor. Anything narrower leaves insufficient room for the chair base. The legs cannot rest flat on the surface. A tilted chair creates serious fall risks.
Depth also matters for proper fit. The tub must measure at least 30 inches from the back wall to the front edge. This length provides enough room for the chair and the user’s legs. Shorter tubs force the knees against the wall. This position causes discomfort during use.
Height requirements vary by user and chair design. Most shower chairs adjust between 13 and 21 inches in seat height. The tub depth must accommodate this range. A person should measure from the drain to the rim before selecting any model.
Compact shower chairs exist for tighter spaces. These models feature narrower bases measuring 13 to 14 inches. They fit tubs that standard chairs cannot accommodate. A person should verify product specifications against actual tub dimensions.
Alternatives to a Full-Size Chair
When a tub proves too small for standard equipment, several alternatives exist. Each option offers distinct advantages for specific situations.
A transfer bench places two legs outside the tub. This design eliminates the need for all four legs inside the basin. The user sits on the bench and slides across into the bathing area. This method works well for narrow tubs with limited floor space.
A backless stool offers another compact solution. These simple seats feature minimal footprints. They fit spaces where larger chairs cannot go. The lack of arms and backrest reduces overall dimensions significantly.
A bath board spans the tub walls and provides a stable sitting surface. This option works for users with adequate upper body strength. The board rests on the tub rim rather than the floor. This design bypasses floor space limitations entirely.
A person should consider individual mobility needs when choosing among these options. Each alternative serves different levels of independence and physical capability. Professional guidance helps match the right product to the user.
Safety Checks Before First Use
Before placing any shower chair inside a bathtub, a person should perform several safety checks. These steps confirm the product is safe and ready for use. Skipping these checks risks injury during the first shower.
Inspecting the Shower Chair’s Condition
A thorough inspection reveals defects before they cause problems. A person should examine the entire chair carefully.
Checking for Cracks or Rust
A person should inspect the frame, seat, and backrest for cracks. Hairline fractures in plastic or metal weaken the structure. Rust spots on metal frames signal corrosion and reduced strength. Any damaged shower chairs should be returned or replaced immediately.
Verifying the Feet are Intact
The feet play a critical role in stability. A person should check each foot for cracks, wear, or missing pieces. Suction cups must remain pliable and free of tears. Rubber feet should show no signs of hardening or flattening. Damaged feet compromise the shower seat’s grip on wet surfaces.
Testing the Chair Outside the Bathtub
A flat-floor test reveals stability issues before the chair enters the tub. This step takes only a few minutes.
Checking for Stability on a Flat Floor
A person should place the shower chair on a level bathroom floor. The following checks help confirm stability:
- Gently rock the shower chair before sitting on it to confirm the legs are secure and it will not tip over.
- Check whether the chair slides on the shower floor; if it does, rubber feet or another anti-slip feature may be needed.
- If the chair feels unstable or wobbly during these checks, return or replace it before use.
Testing the Weight Limit
A person should verify the chair supports the intended user’s weight. This step prevents structural failure during use.
Check the manufacturer’s guidelines to ensure the chair can safely support your weight. Most shower chairs range from 250 to 500 pounds, so choose one that suits your needs for stability.
Final In-Tub Safety Checklist
The final checks occur inside the tub. These steps confirm the chair sits properly on the tub floor.
Ensuring the Chair is Level
A person should place the chair on the tub floor and check the seat height. The seat should sit level with no tilting. Adjustable legs help correct minor slopes.
Confirming No Movement When Shaken
A person should grip the chair and shake it gently. Any sliding or wobbling signals a problem. All four feet must contact the tub floor firmly.
Having Someone Spot You for the First Try
A helper should stand nearby during the first use. This person provides support if the user loses balance. A spotter adds a critical layer of safety.
A proper shower chair fit bathtub requires three steps. First, measure the interior of the bathtub. Second, measure the base of the shower chair. Third, compare both sets of numbers with a safety margin. Slope and shape matter just as much as raw dimensions. A secure fit means the chair sits level and stable. All four feet must contact the tub floor. A person should always do a dry run test before using any shower chairs in a wet environment. Shower chairs with the wrong size create real danger. A shower seat or shower bench must match the tub height and shape. Taking time to measure correctly ensures safety and peace of mind.
FAQ
How do I measure my bathtub for a shower chair?
Measure the interior floor width at the narrowest point. Record the length from the back wall to the front edge. Check the depth at both the drain and back wall. These numbers reveal the usable floor area for any shower chair.
What is the minimum bathtub width for a shower chair?
Most standard shower chairs need at least 24 inches of floor width. Compact models fit spaces as narrow as 13 inches. A person should always leave one to two inches of clearance on each side for stability.
Can I use a shower chair on a sloped bathtub floor?
Yes, if the chair has adjustable legs. A person can set each leg individually to compensate for the slope. A drop greater than two inches may make the chair unstable. A transfer bench works better for steep slopes.
How do I know if my shower chair is stable enough?
Place the chair in the empty tub. Press down on each corner of the seat. Any rocking or wobbling signals a problem. All four feet must contact the tub floor firmly before use.
What should I do if my shower chair does not fit?
A chair that touches both tub walls cannot sit flat. Consider a compact model with a narrower base. A transfer bench or backless stool offers alternatives for very narrow tubs.
Do suction cup feet work on all bathtub surfaces?
Suction cups work best on smooth, flat surfaces. Textured or rough tub floors prevent proper sealing. Rubber feet offer better grip on these surfaces. A person should match the foot type to the tub floor material.
How much weight can a shower chair hold?
Most shower chairs support between 250 and 500 pounds. A person should check the manufacturer’s specifications before buying. The stated capacity must exceed the user’s weight for safe operation.
Can I use a regular chair in the bathtub?
No. Regular chairs lack water-resistant materials and non-slip feet. They rust, crack, or slip on wet surfaces. Only use products specifically designed for bathroom use.